Features
Tags
In DefectDojo, tags are a first class citizen and are recognized as the facilitators of organization within each level of the data model. Tags are ideal for grouping objects in a manner that can be filtered out into smaller, more digestible chunks.
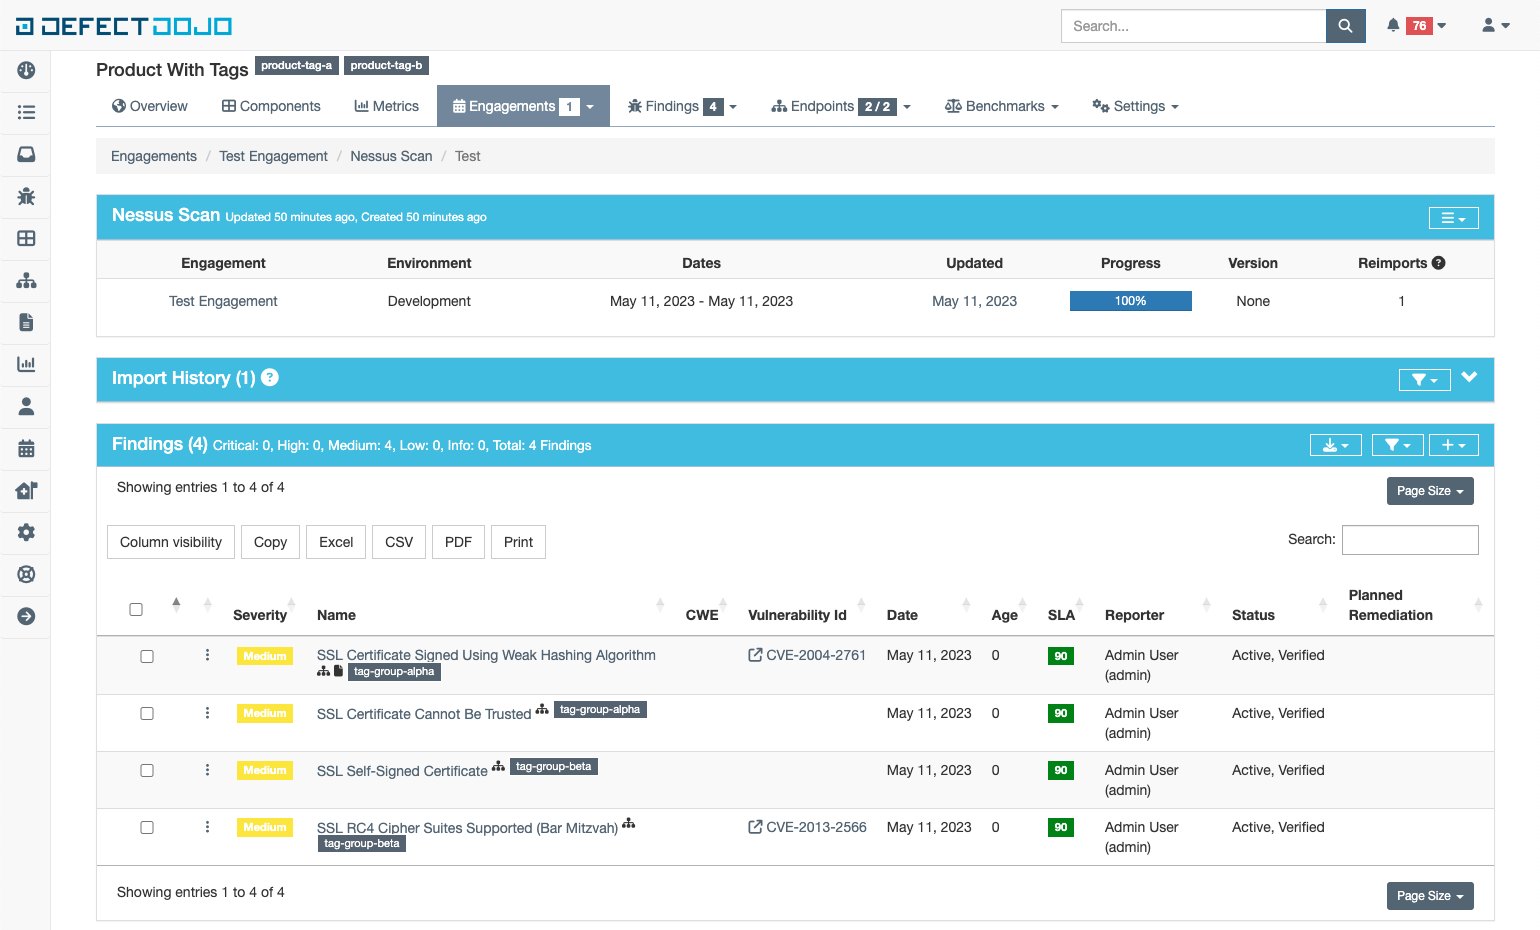
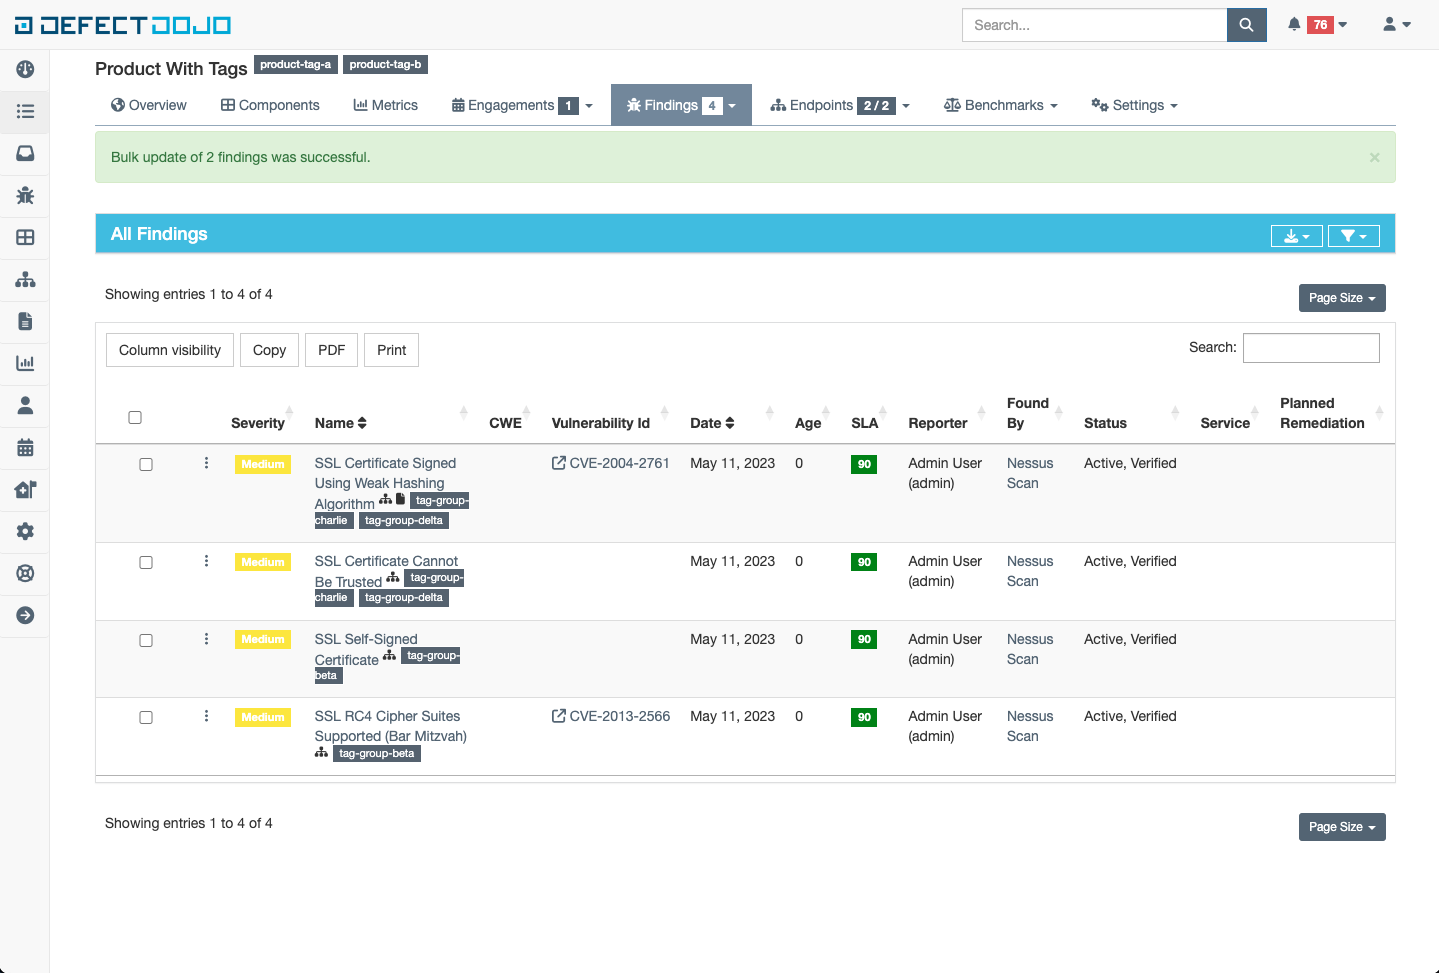
Here is an example with a product with two tags and four findings each with a single tag
Format of tag
Tags can be formatted in any of the following ways:
- StringWithNoSpaces
- string-with-hyphens
- string_with_underscores
- colons:acceptable
- “quoted string with spaces”
- “quoted,comma,tag”
- “quoted with spaces, and also commas!”
Adding and Removing
Tags can be managed in the following ways
Creating or Editing new objects
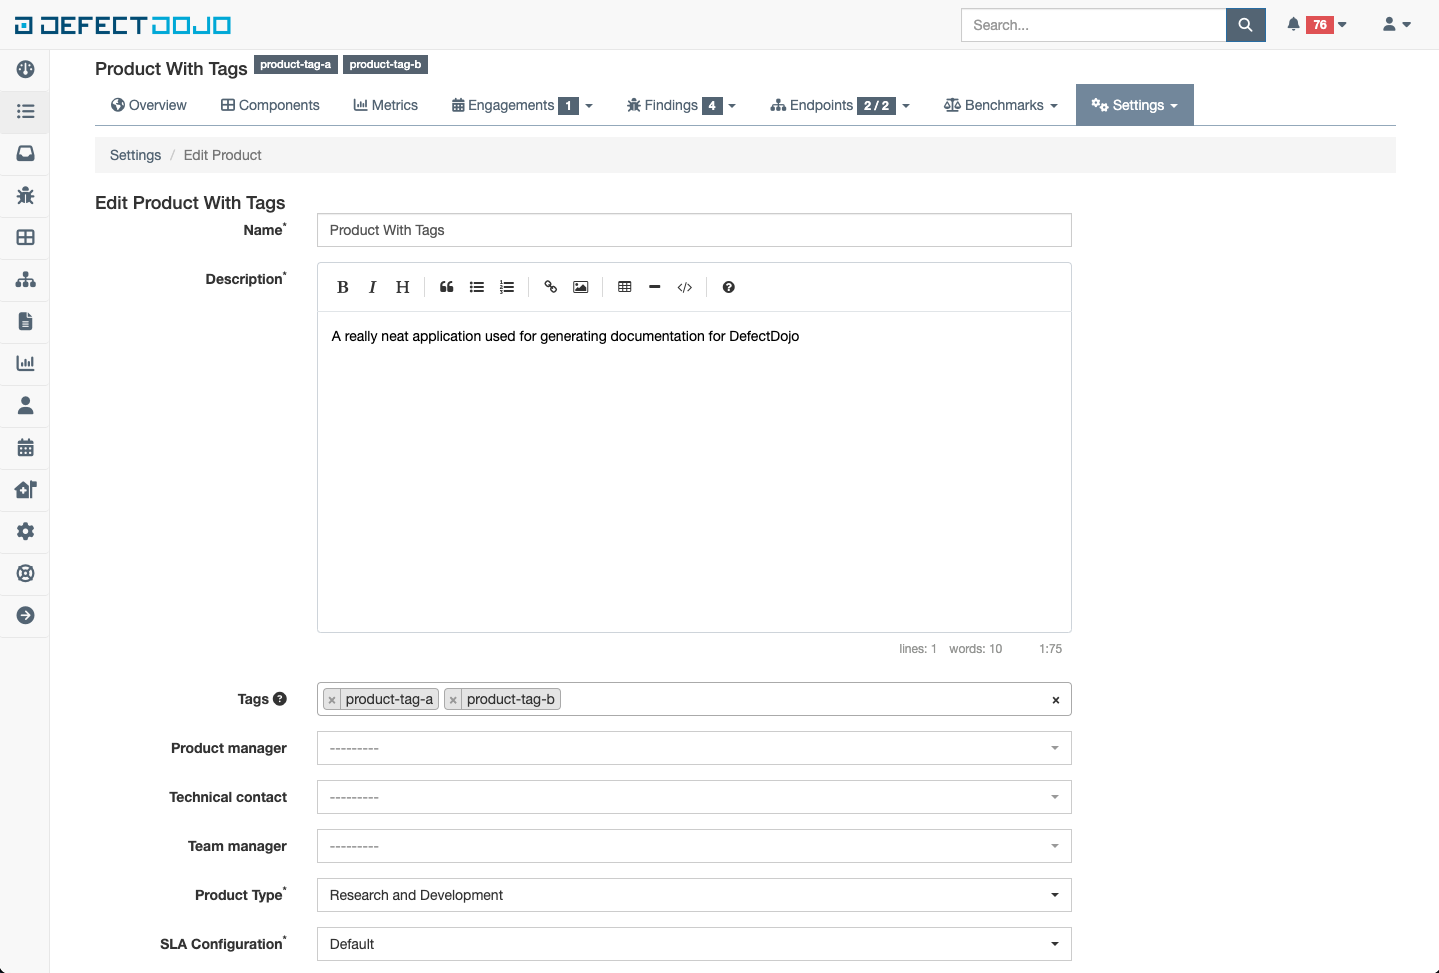
When a new object is created or edited through the UI or API, there is a field for specifying the tags to be set on a given object. This field is a multiselect field that also has auto completion to make searching and adding existing tags a breeze. Here is what the field looks like on the product from the screenshot in the previous section:
Import and Reimport
Tags can also be applied to a given test at the time of import or reimport. This is a very handy use case when importing via the API with automation as it provides an opportunity to append automation run details and tool information that may not be captured in the test or finding object directly.
The field looks and behaves exactly as it does on a given object
Bulk Edit Menu (Findings only)
When needing to update many findings with the same set of tags, the bulk edit menu can be used to ease the burden.
In the following example, lets say I want to update the tags of the two findings with the tag “tag-group-alpha” to be a new tag list like this [“tag-group-charlie”, “tag-group-delta”]. First I would select the tags to be updated:
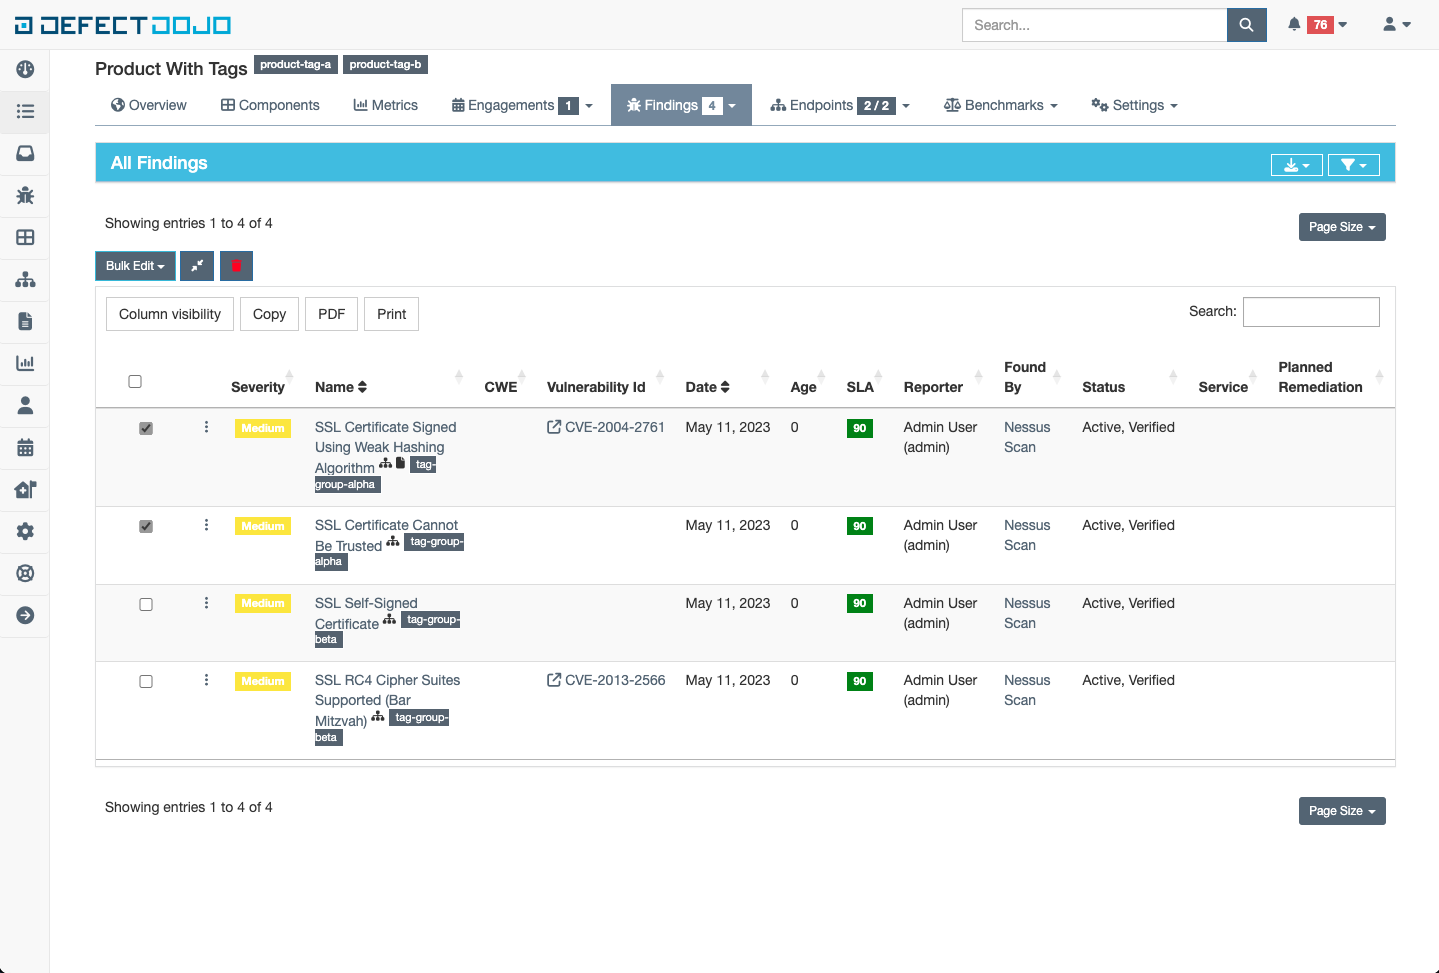
Once a finding is selected, a new button appears with the name “Bulk Edit”. Clicking this button produces a dropdown menu with many options, but the focus is just on tags for now. Update the field to have the desired tag list as follows, and click submit
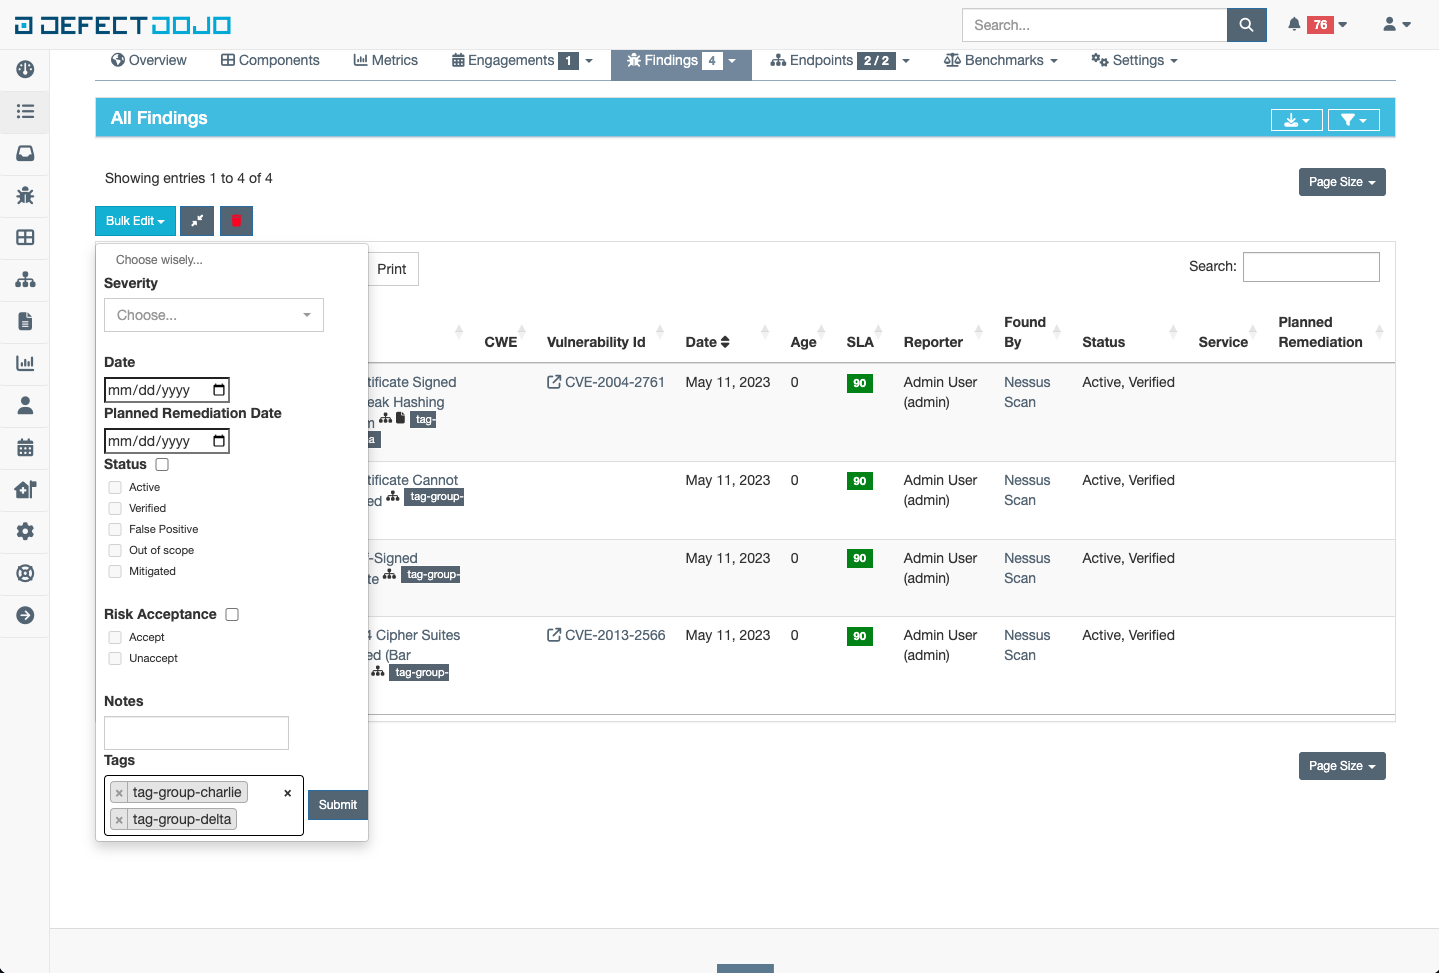
The tags on the selected Findings will be updated to whatever was specified in the tags field within the bulk edit menu
Filtering
Tags can be filtered in many ways through both the UI and the API. For example, here is a snippet of the Finding filters:
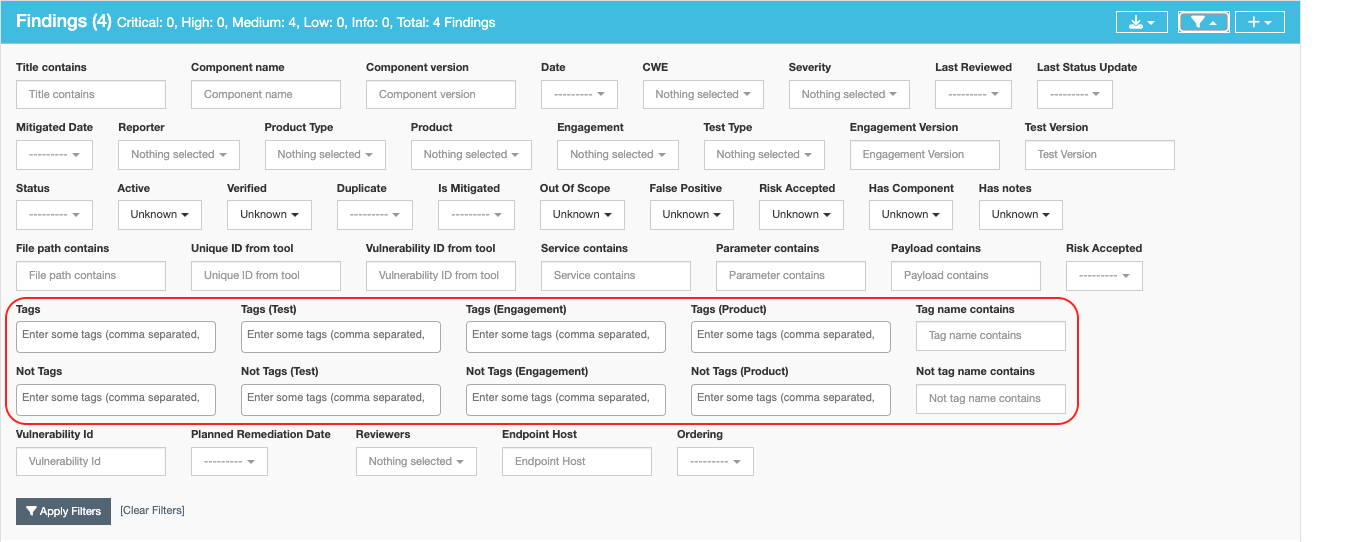
There are ten fields related to tags:
- Tags: filter on any tags that are attached to a given Finding
- Examples:
- Finding will be returned
- Finding Tags: [“A”, “B”, “C”]
- Filter Query: “B”
- Finding Will not be returned
- Finding Tags: [“A”, “B”, “C”]
- Filter Query: “F”
- Finding will be returned
- Examples:
- Not Tags: filter on any tags that are not attached to a given Finding
- Examples:
- Finding will be returned
- Finding Tags: [“A”, “B”, “C”]
- Filter Query: “F”
- Finding Will not be returned
- Finding Tags: [“A”, “B”, “C”]
- Filter Query: “B”
- Finding will be returned
- Examples:
- Tag Name Contains: filter on any tags that contain part or all of the query in the given Finding
- Examples:
- Finding will be returned
- Finding Tags: [“Alpha”, “Beta”, “Charlie”]
- Filter Query: “et” (part of “Beta”)
- Finding Will not be returned
- Finding Tags: [“Alpha”, “Beta”, “Charlie”]
- Filter Query: “meg” (part of “Omega”)
- Finding will be returned
- Examples:
- Not Tags: filter on any tags that do not contain part or all of the query in the given Finding
- Examples:
- Finding will be returned
- Finding Tags: [“Alpha”, “Beta”, “Charlie”]
- Filter Query: “meg” (part of “Omega”)
- Finding Will not be returned
- Finding Tags: [“Alpha”, “Beta”, “Charlie”]
- Filter Query: “et” (part of “Beta”)
- Finding will be returned
- Examples:
For the other six tag filters, they follow the same rules as “Tags” and “Not Tags” as above, but at different levels in the data model:
- Tags (Test): filter on any tags that are attached to the Test of a given Finding is part of
- Not Tags (Test): filter on any tags that are not attached to the Test of a given Finding is part of
- Tags (Engagement): filter on any tags that are attached to the Engagement of a given Finding is part of
- Not Tags (Engagement): filter on any tags that are not attached to the Engagement of a given Finding is part of
- Tags (Product): filter on any tags that are attached to the Product of a given Finding is part of
- Not Tags (Product): filter on any tags that are not attached to the Product of a given Finding is part of
Tag Inheritance
When enabled, tags applied to a given product will automatically be applied to all objects under products in the data model.
Configuration
Tag Inheritance can be enabled at the following scope levels:
- Global Scope
- Every product system wide will begin applying tags to all children objects
- This is set within the System Settings
- Product Scope
- Only the selected product will begin applying tags to all children objects
- This is set at the product creation/edit page
Behaviors
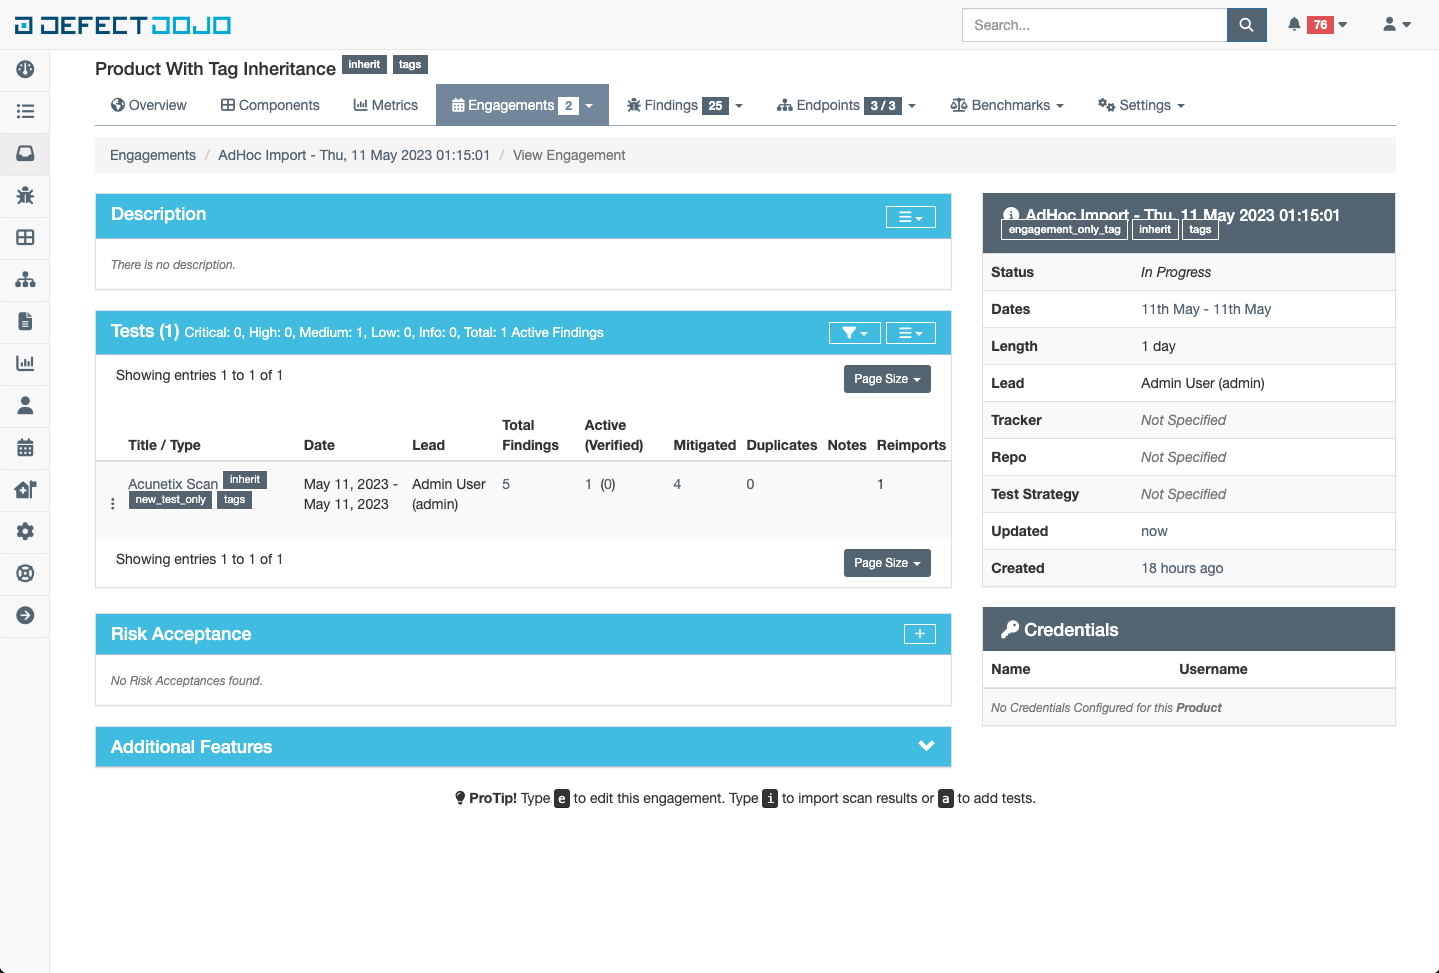
Tags can be added and removed to other objects the same as when tag inheritance is disabled. The only exception to that rule being inherited tags as they cannot be removed from an object. See the following example of adding a tag “test_only_tag” to the Test object and a tag “engagement_only_tag” to the Engagement.
When updates are made to the tag list on a product, the same changes are made to all objects within the product asynchronously. The duration of this task directly correlates to the number the objects contained within a finding. If the results are not observed within a reasonable time period, consult the celery worker logs to identify where any problems might have arisen.
Risk Acceptance
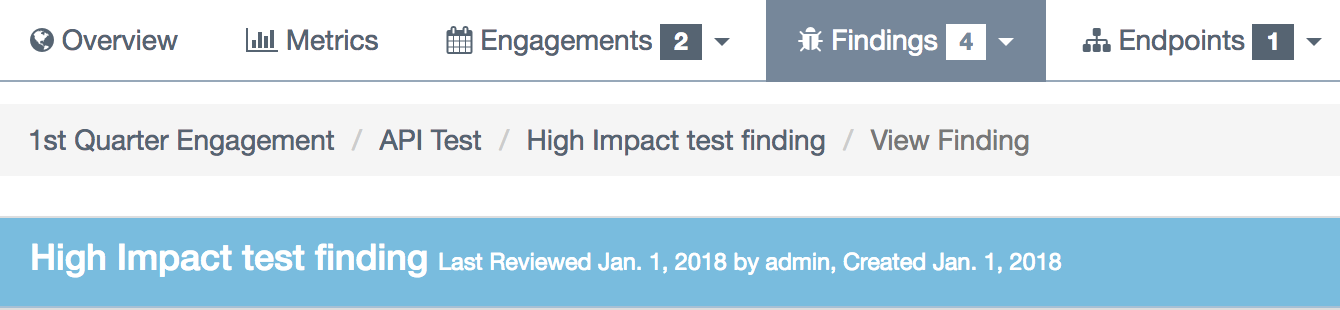
Findings cannot always be remediated or addressed for various reasons. A finding 'status' can be change to 'accepted' by doing the following: Findings are accepted in the engagement view. To locate the engagement from the finding click the link to engagement as shown below.
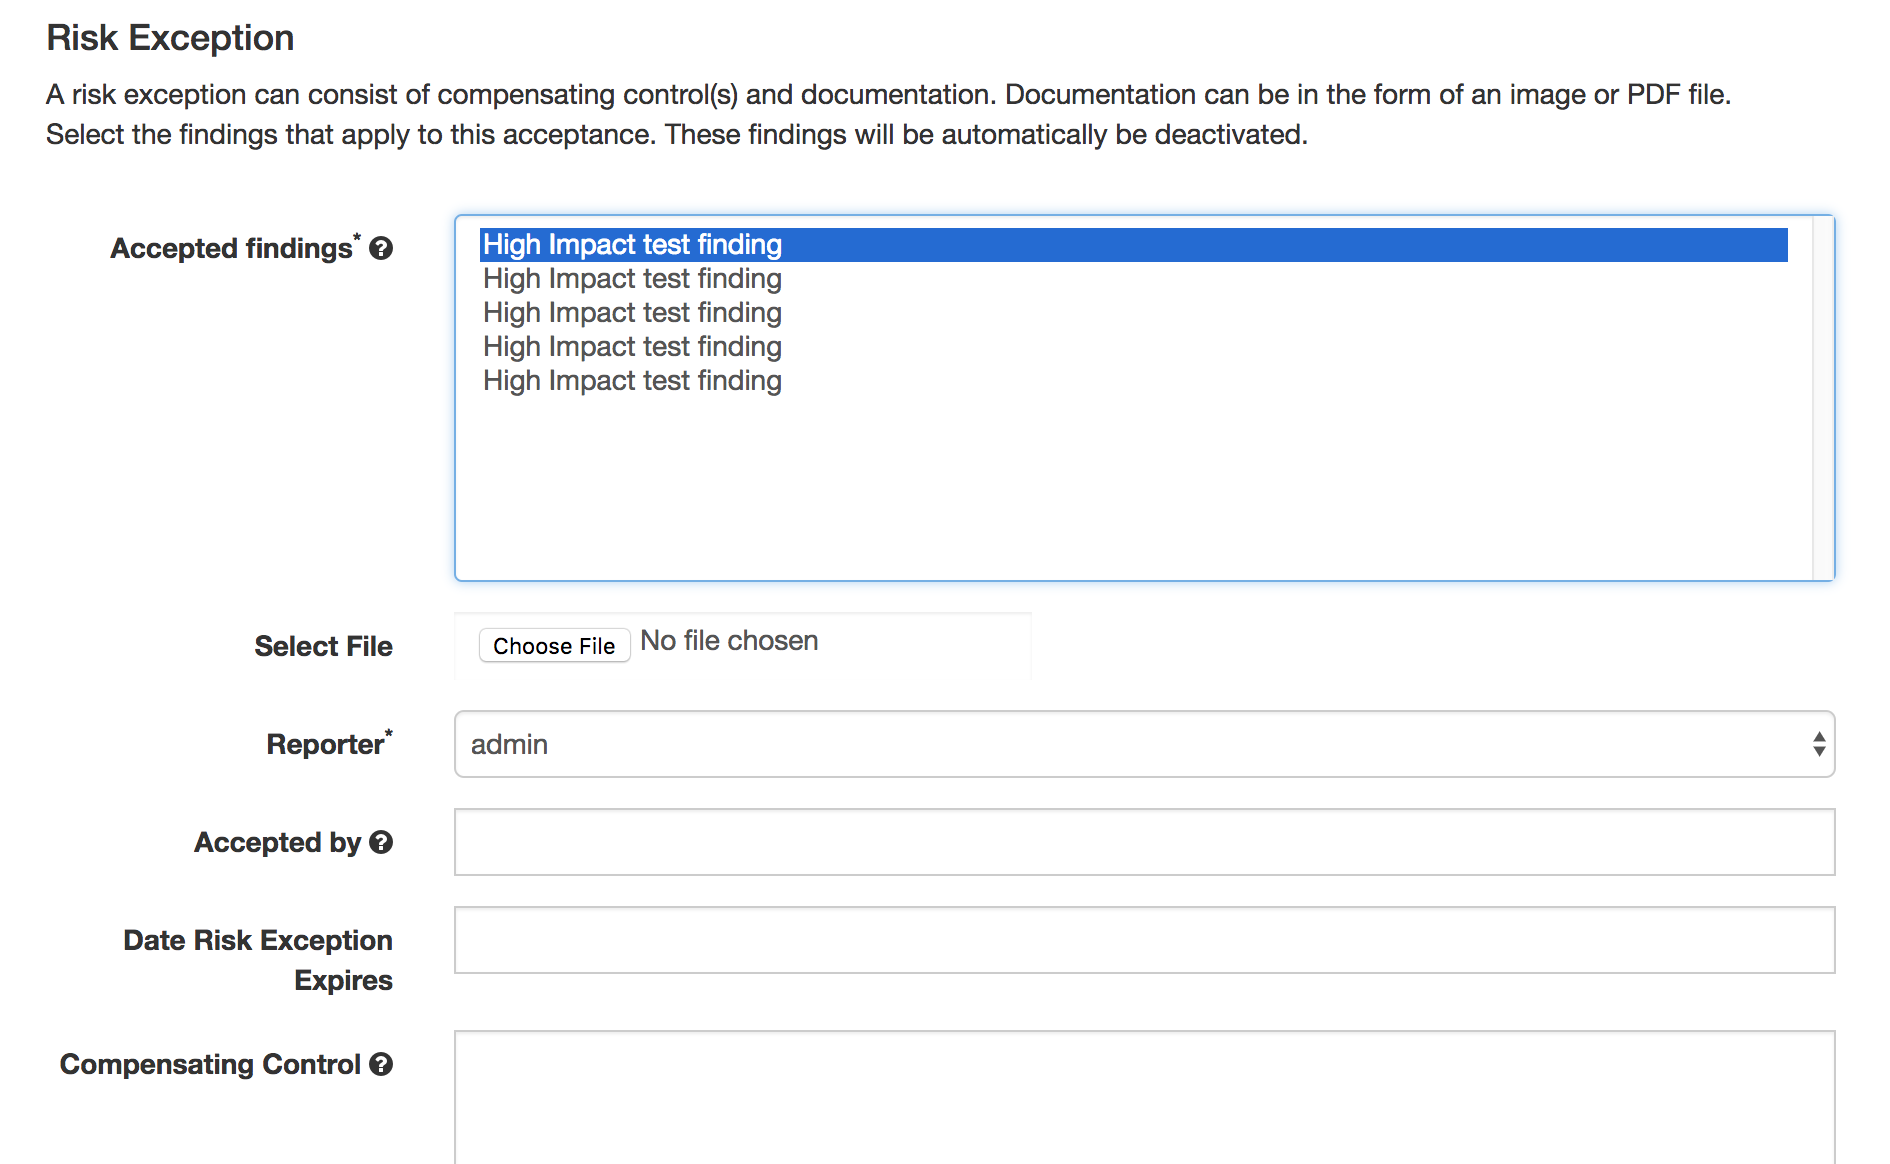
Then, in the engagement view click the plus icon in the 'Risk Acceptance' box and fill in the details to support the risk acceptance.
The engagement view is now updated with the risk.

The finding status changes to 'Accepted' with a link to the risk acceptance.

Deduplication
Deduplication is a feature that when enabled will compare findings to automatically identify duplicates. When deduplication is enabled, a list of deduplicated findings is added to the engagement view. The following image illustrates the option deduplication on engagement and deduplication on product level:

Upon saving a finding, DefectDojo will look at the other findings in the product or the engagement (depending on the configuration) to find duplicates
When a duplicate is found:
- The newly imported finding takes status: inactive, duplicate
- An "Original" link is displayed after the finding status, leading to the original finding
There are two ways to use the deduplication:
- Deduplicate vulnerabilities in the same build/release. The vulnerabilities may be found by the same scanner (same scanner deduplication) or by different scanners (cross-scanner deduplication).
- this helps analysis and assessment of the technical debt, especially if using many different scanners; although detecting duplicates across scanners is not trivial as it requires a certain standardization.
- Track unique vulnerabilities across builds/releases so that DefectDojo knows when it finds a vulnerability that has seen it before.
this allows you keep information attached to a given finding in a unique place: all further duplicate findings will point to the original one.
Deduplication configuration
Global configuration
The deduplication can be activated in "System Settings" by ticking "Deduplicate findings".
An option to delete duplicates can be found in the same menu, and the maximum number of duplicates to keep for the same finding can be configured.
Engagement configuration
When creating or editing an engagement, the "Deduplication within engagement only" checkbox can be ticked.
- If activated: Findings are only deduplicated within the same engagement. Findings present in different engagements cannot be duplicates
- Otherwise: Findings are deduplicated across the whole product
Note that currently deduplication does not occur across different products.
Deduplication algorithms
The behavior of the deduplication can be configured for each parser in
settings.dist.py (or settings.py after install) by configuring the
DEDUPLICATION_ALGORITHM_PER_PARSER variable, or via the env variable (useful for Kubernetes deployments) DD_DEDUPLICATION_ALGORITHM_PER_PARSER with a JSON string like
{"ScannerName":"algorithm"}
The environment variable will override the settings in settings.dist.py, replacing by matching the keys.
The available algorithms are:
- DEDUPE_ALGO_UNIQUE_ID_FROM_TOOL
- The deduplication occurs based on
finding.unique_id_from_tool which is a unique technical
id existing in the source tool. Few scanners populate this
field currently. If you want to use this algorithm, you may
need to update the scanner code beforehand.
- Advantages:
- If your source tool has a reliable means of tracking a unique vulnerability across scans, this configuration will allow defectDojo to use this ability.
- Drawbacks:
- Using this algorithm will not allow cross-scanner deduplication as other tools will have a different technical id.
- When the tool evolves, it may change the way the unique id is generated. In that case you won't be able to recognise that findings found in previous scans are actually the same as the new findings.
- DEDUPE_ALGO_HASH_CODE
- The deduplication occurs based on finding.hash_code. The
hash_code itself is configurable for each scanner in
parameter
HASHCODE_FIELDS_PER_SCANNER. - DEDUPE_ALGO_UNIQUE_ID_FROM_TOOL_OR_HASH_CODE
- A finding is a duplicate with another if they have the same
unique_id_from_tool OR the same hash_code.
- Allows to use both
- a technical deduplication (based on unique_id_from_tool) for a reliable same-parser deduplication
- and a functional one (based on hash_code configured on CWE+severity+file_path for example) for cross-parser deduplication
- DEDUPE_ALGO_LEGACY
- This is algorithm that was in place before the configuration
per parser was made possible, and also the default one for
backward compatibility reasons.
- Legacy algorithm basically deduplicates based on:
- For static scanner: ['title', 'cwe', 'line', 'file_path', 'description']
- For dynamic scanner: ['title', 'cwe', 'line', 'file_path', 'description', 'endpoints']
Note that there are some subtleties that may give unexpected results. Switch
dojo.specific-loggers.deduplicationto debug insettings.pyto get more info in case of trouble.
Hash_code computation configuration
The hash_code computation can be configured for each parser using the
parameter HASHCODE_FIELDS_PER_SCANNER in
settings.dist.py, or via the env variable (useful for Kubernetes deployments) DD_HASHCODE_FIELDS_PER_SCANNER with a JSON string like
{"ScannerName":["field1", "field2"]}
The environment variable will override the settings in settings.dist.py, replacing by matching the keys.
The parameter HASHCODE_ALLOWED_FIELDS list the fields
from finding table that were tested and are known to be working when
used as a hash_code. Don't hesitate to enrich this list when required
(the code is generic and allows adding new fields by configuration only)
Note that endpoints isn't a field from finding table but
rather a meta value that will trigger a computation based on all the
endpoints.
When populating HASHCODE_FIELDS_PER_SCANNER, please
respect the order of declaration of the fields: use the same order as in
HASHCODE_ALLOWED_FIELDS: that will allow cross-scanner
deduplication to function because the hash_code is computed as a
sha-256 of concatenated values of the configured fields.
Tips:
It's advised to use fields that are standardized for a reliable deduplication, especially if aiming at cross-scanner deduplication. For example
titleanddescriptiontend to change when the tools evolve and don't allow cross-scanner deduplication- Good candidates are
cweorcve- Adding the severity will make sure the deduplication won't be to aggressive (there are several families of XSS and sql injection for example, with various severities but the same cwe).
- Adding the file_path or endpoints is advised too.
The parameter
HASHCODE_ALLOWS_NULL_CWEwill allow switching to legacy algorithm when a null cwe is found for a given finding: this is to avoid getting many duplicates when the tool fails to give a cwe while we are expecting it.
Hashcode generation / regeneration
When you change the hashcode configuration, it is needed to regenerated the hashcodes for all findings, or at least those findings found by scanners for which the configuration was updated.
This is sometimes also needed after an upgrade to a new DefectDojo version, for example when we made changes to the hashcode configuration or calculation logic. We will mention this in the upgrade notes.
To regenerate the hashcodes, use the dedupe management command:
docker compose exec uwsgi ./manage.py dedupe --hash_code_onlyThis will only regenerated the hashcodes, but will not run any deduplication logic on existing findings. If you want to run deduplication again on existing findings to make sure any duplicates found by the new hashcode config are marked as such, run:
docker compose exec uwsgi ./manage.py dedupeThe deduplication part of this command will run the deduplication for each finding in a celery task. If you want to run the deduplication in the foreground process, use:
docker compose exec uwsgi ./manage.py dedupe --dedupe_syncPlease note the deduplication process is resource intensive and can take a long time to complete (estimated ~7500 findings per minute when run in the foreground)
Debugging deduplication
There is a specific logger that can be activated in order to have
details about the deduplication process : switch
dojo.specific-loggers.deduplication to debug in
settings.dist.py.
Deduplication - APIv2 parameters
close_old_findings: if true, findings that are not duplicates and that were in the previous scan of the same type (example ZAP) for the same engagement (or product in case of "close_old_findings_product_scope") and that are not present in the new scan are closed (Inactive, Verified, Mitigated).close_old_findings_product_scope: if true, close_old_findings applies to all findings of the same type in the product. Note that "Deduplication on engagement" is no longer used to determine the scope of close_old_findings.
Deduplication / Similar findings
Similar Findings Visualization:

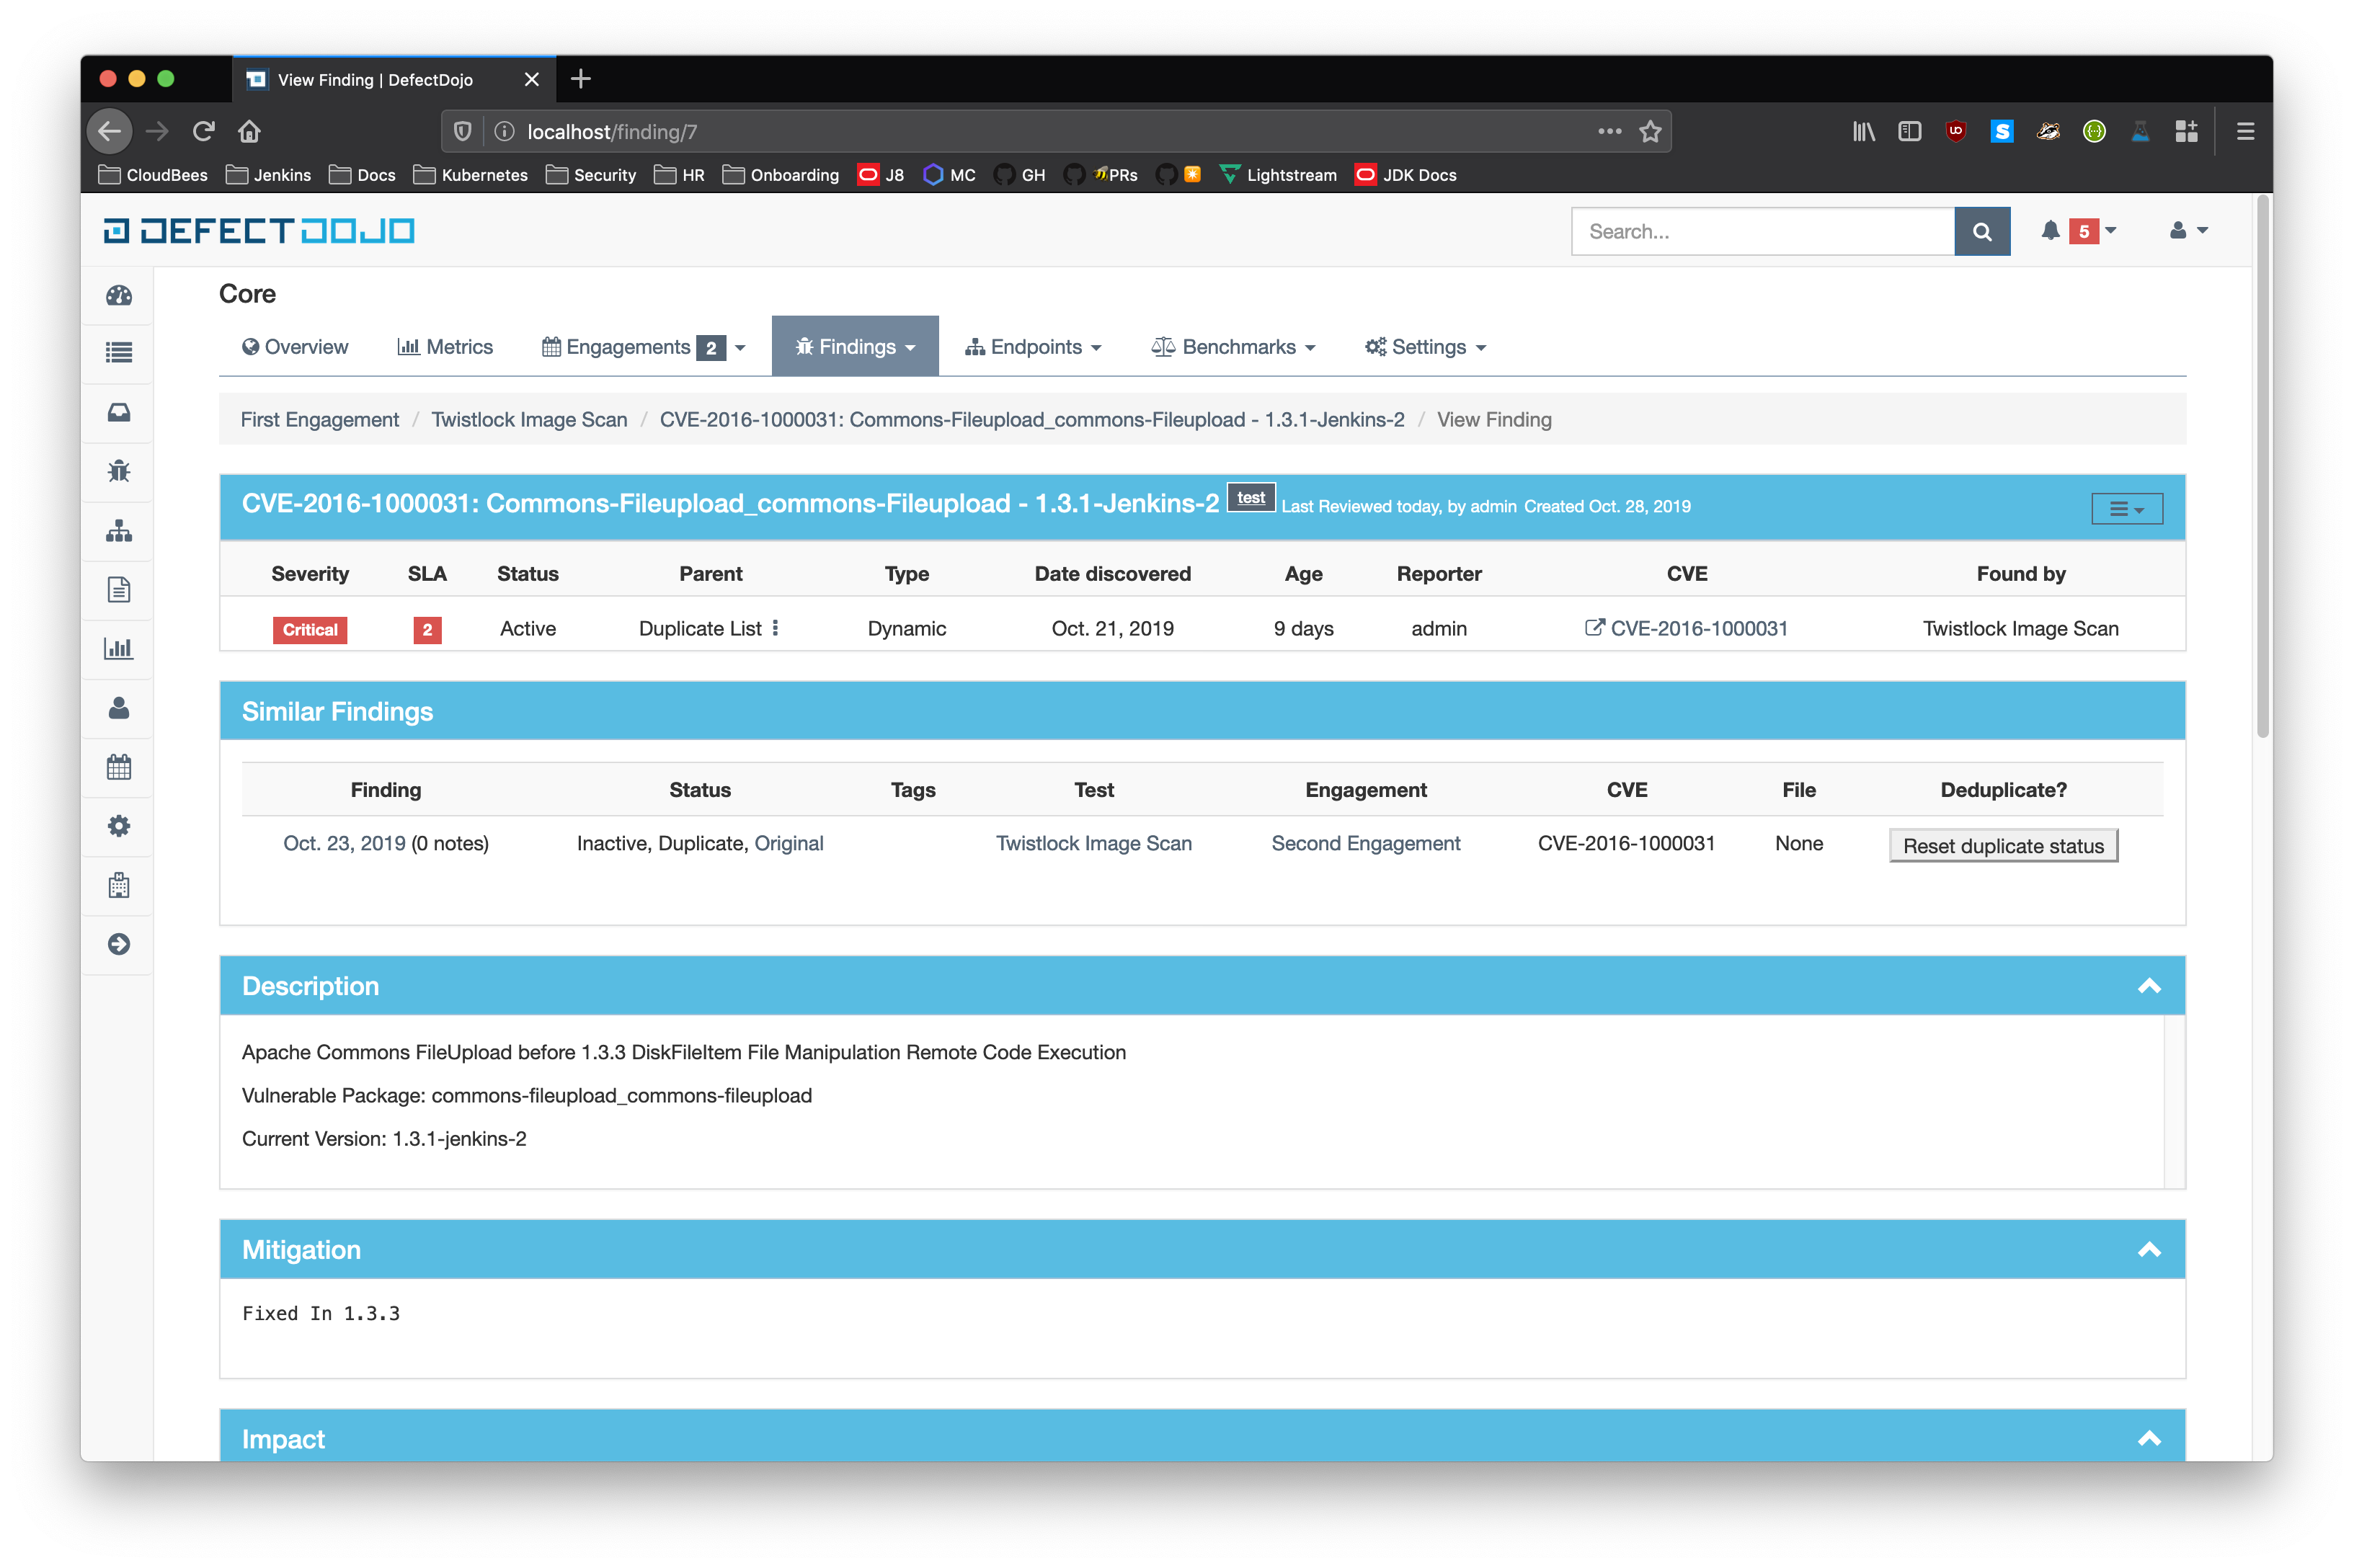
- Similar Findings
- While viewing a finding, similar findings within the same product are listed along with buttons to mark one finding a duplicate of the other. Clicking the "Use as original" button on a similar finding will mark that finding as the original while marking the viewed finding as a duplicate. Clicking the "Mark as duplicate" button on a similar finding will mark that finding as a duplicate of the viewed finding. If a similar finding is already marked as a duplicate, then a "Reset duplicate status" button is shown instead which will remove the duplicate status on that finding along with marking it active again.
Service Level Agreement (SLA)
DefectDojo allows you to maintain your security SLAs and automatically remind teams whenever a SLA is about to get breached, or is breached.
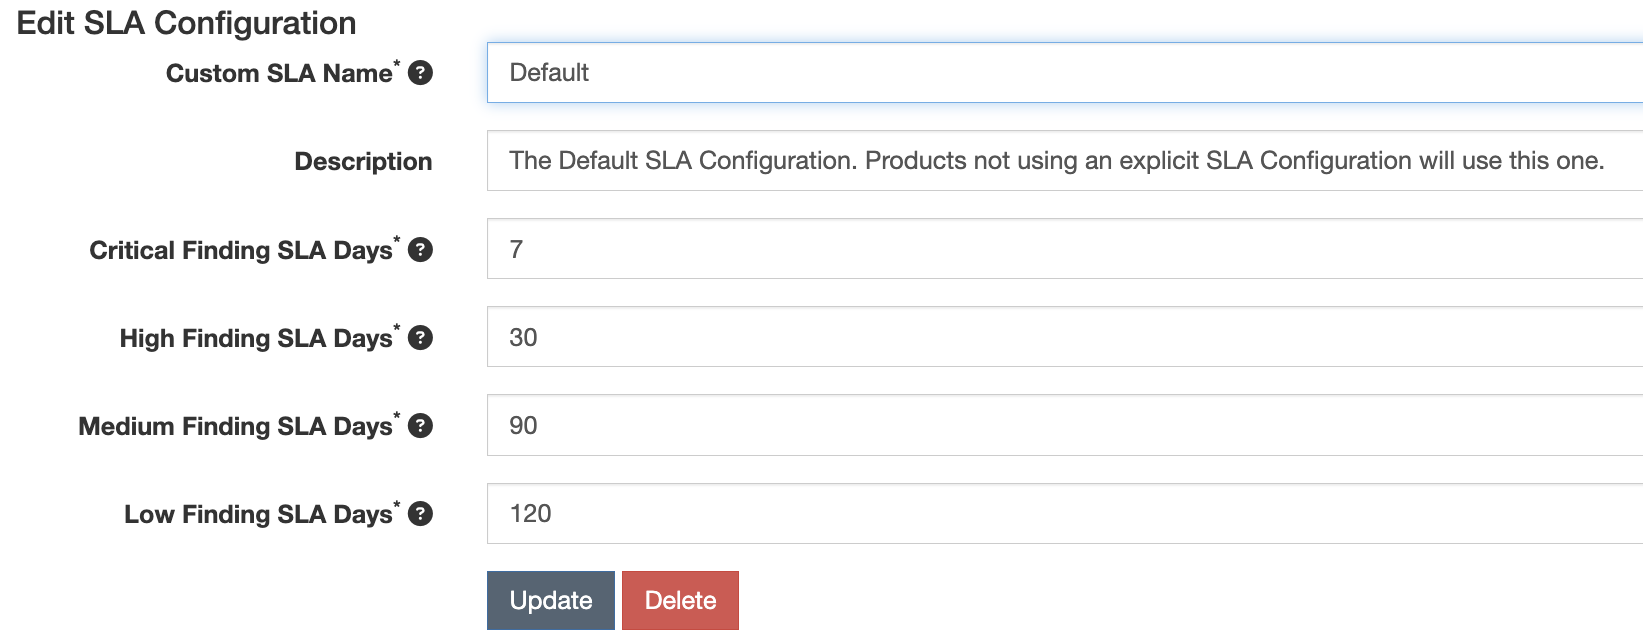
To apply SLAs to Findings, open the System Settings page and check ‘Enable Finding SLAs’.
You will then need to create one or more SLA Configurations, from the SLA Configuration menu (your-defectdojo.com/sla_config).
SLA notification configuration
There are 3 variables in the system settings that can be set for notifications of SLA breaches.
By default notifications are disabled.
You can either choose to notify about breaches for findings that are only in ‘Active’ or
for any findings across the instance that are in Active, Verified.
Furthermore, it is possible choose to only consider findings that have a JIRA issue linked to them.
There are 2 variables in the settings.py file that you can configure, to act on the global behavior.
SLA_NOTIFY_PRE_BREACH = 3
SLA_NOTIFY_POST_BREACH = 7
The SLA_NOTIFY_PRE_BREACH is expressed in days. Whenever a finding's
"SLA countdown" (time to remediate) drops to this number, a
notification would be sent everyday, as scheduled by the crontab in
settings.py, until the day it breaches.
The SLA_NOTIFY_POST_BREACH lets you define in days how long you want
to be kept notified about findings that have breached the SLA. Passed
that number, notifications will cease.
Warning
Be mindful of performance if you choose to have SLA notifications on non-verified findings, especially if you import a lot of findings through CI in 'active' state.What notification channels for SLA notifications?
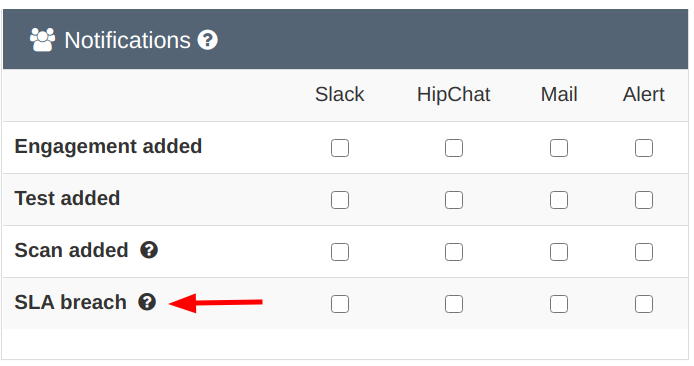
You will notice that an extra SLA breach option is now present
on the Notification page and also in the Product view.
SLA notification with JIRA
You can choose to also send SLA notification as JIRA comments, if your product is configured with JIRA. You can enable this at the Product level in the Product specific JIRA settings.
The Product level JIRA notification configuration takes precendence over the global JIRA notification configuration.
When is the SLA notification job run?
The default setup will trigger the SLA notification code at 7:30am on a
daily basis, as defined in the settings.py file. You can of course
modify this schedule to your context.
'compute-sla-age-and-notify': {
    'task': 'dojo.tasks.async_sla_compute_and_notify',
    'schedule': crontab(hour=7, minute=30),
}
Information
The celery containers are the ones concerned with this configuration. If you suspect things are not working as expected, make sure they have the latest version of your settings.py file.You can of course change this default by modifying that stanza.
Launching from the CLI
You can also invoke the SLA notification function from the CLI. For example, if run from docker compose:
$ docker compose exec uwsgi /bin/bash -c 'python manage.py sla_notifications'Reports
Instant reports
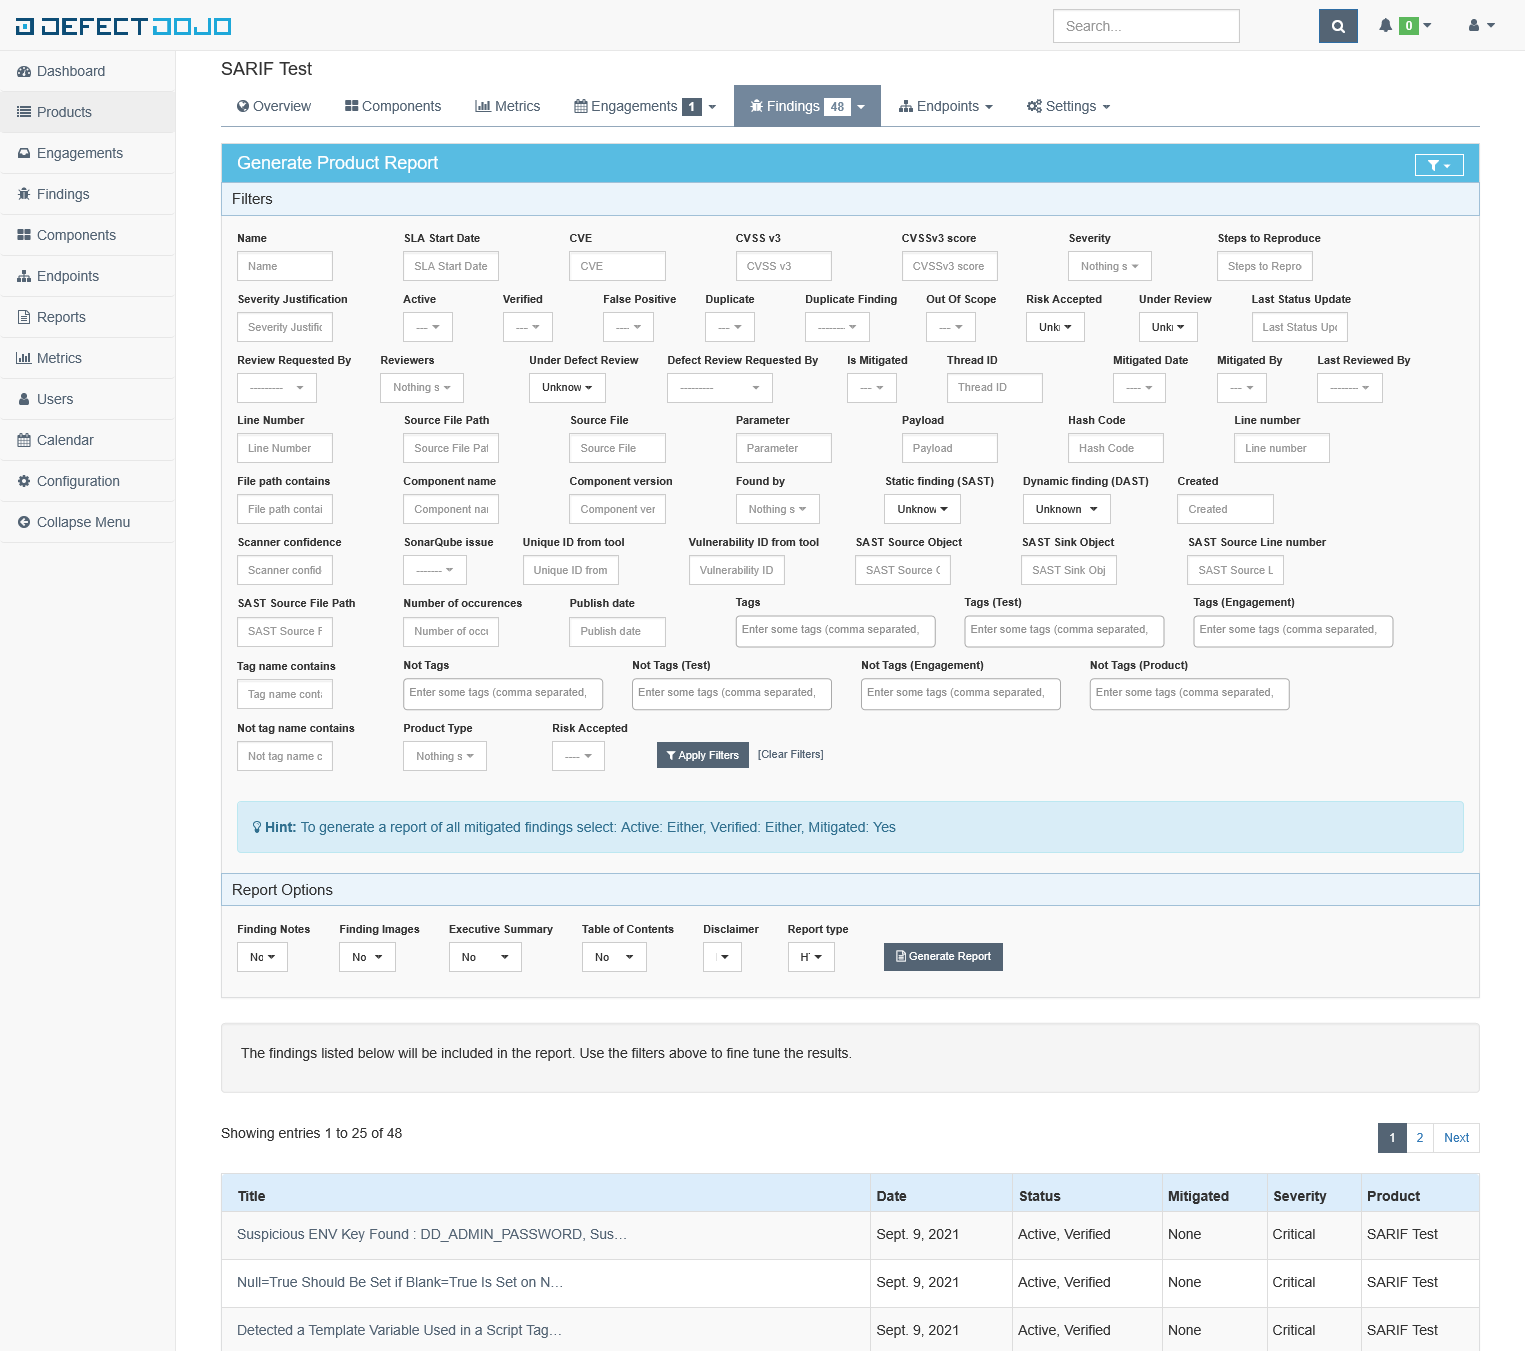
Instant reports can be generated for:
- Product types
- Products
- Engagements
- Tests
- List of Findings
- Endpoints
Filtering is available on all report generation views to aid in focusing the report for the appropriate need.
Custom reports
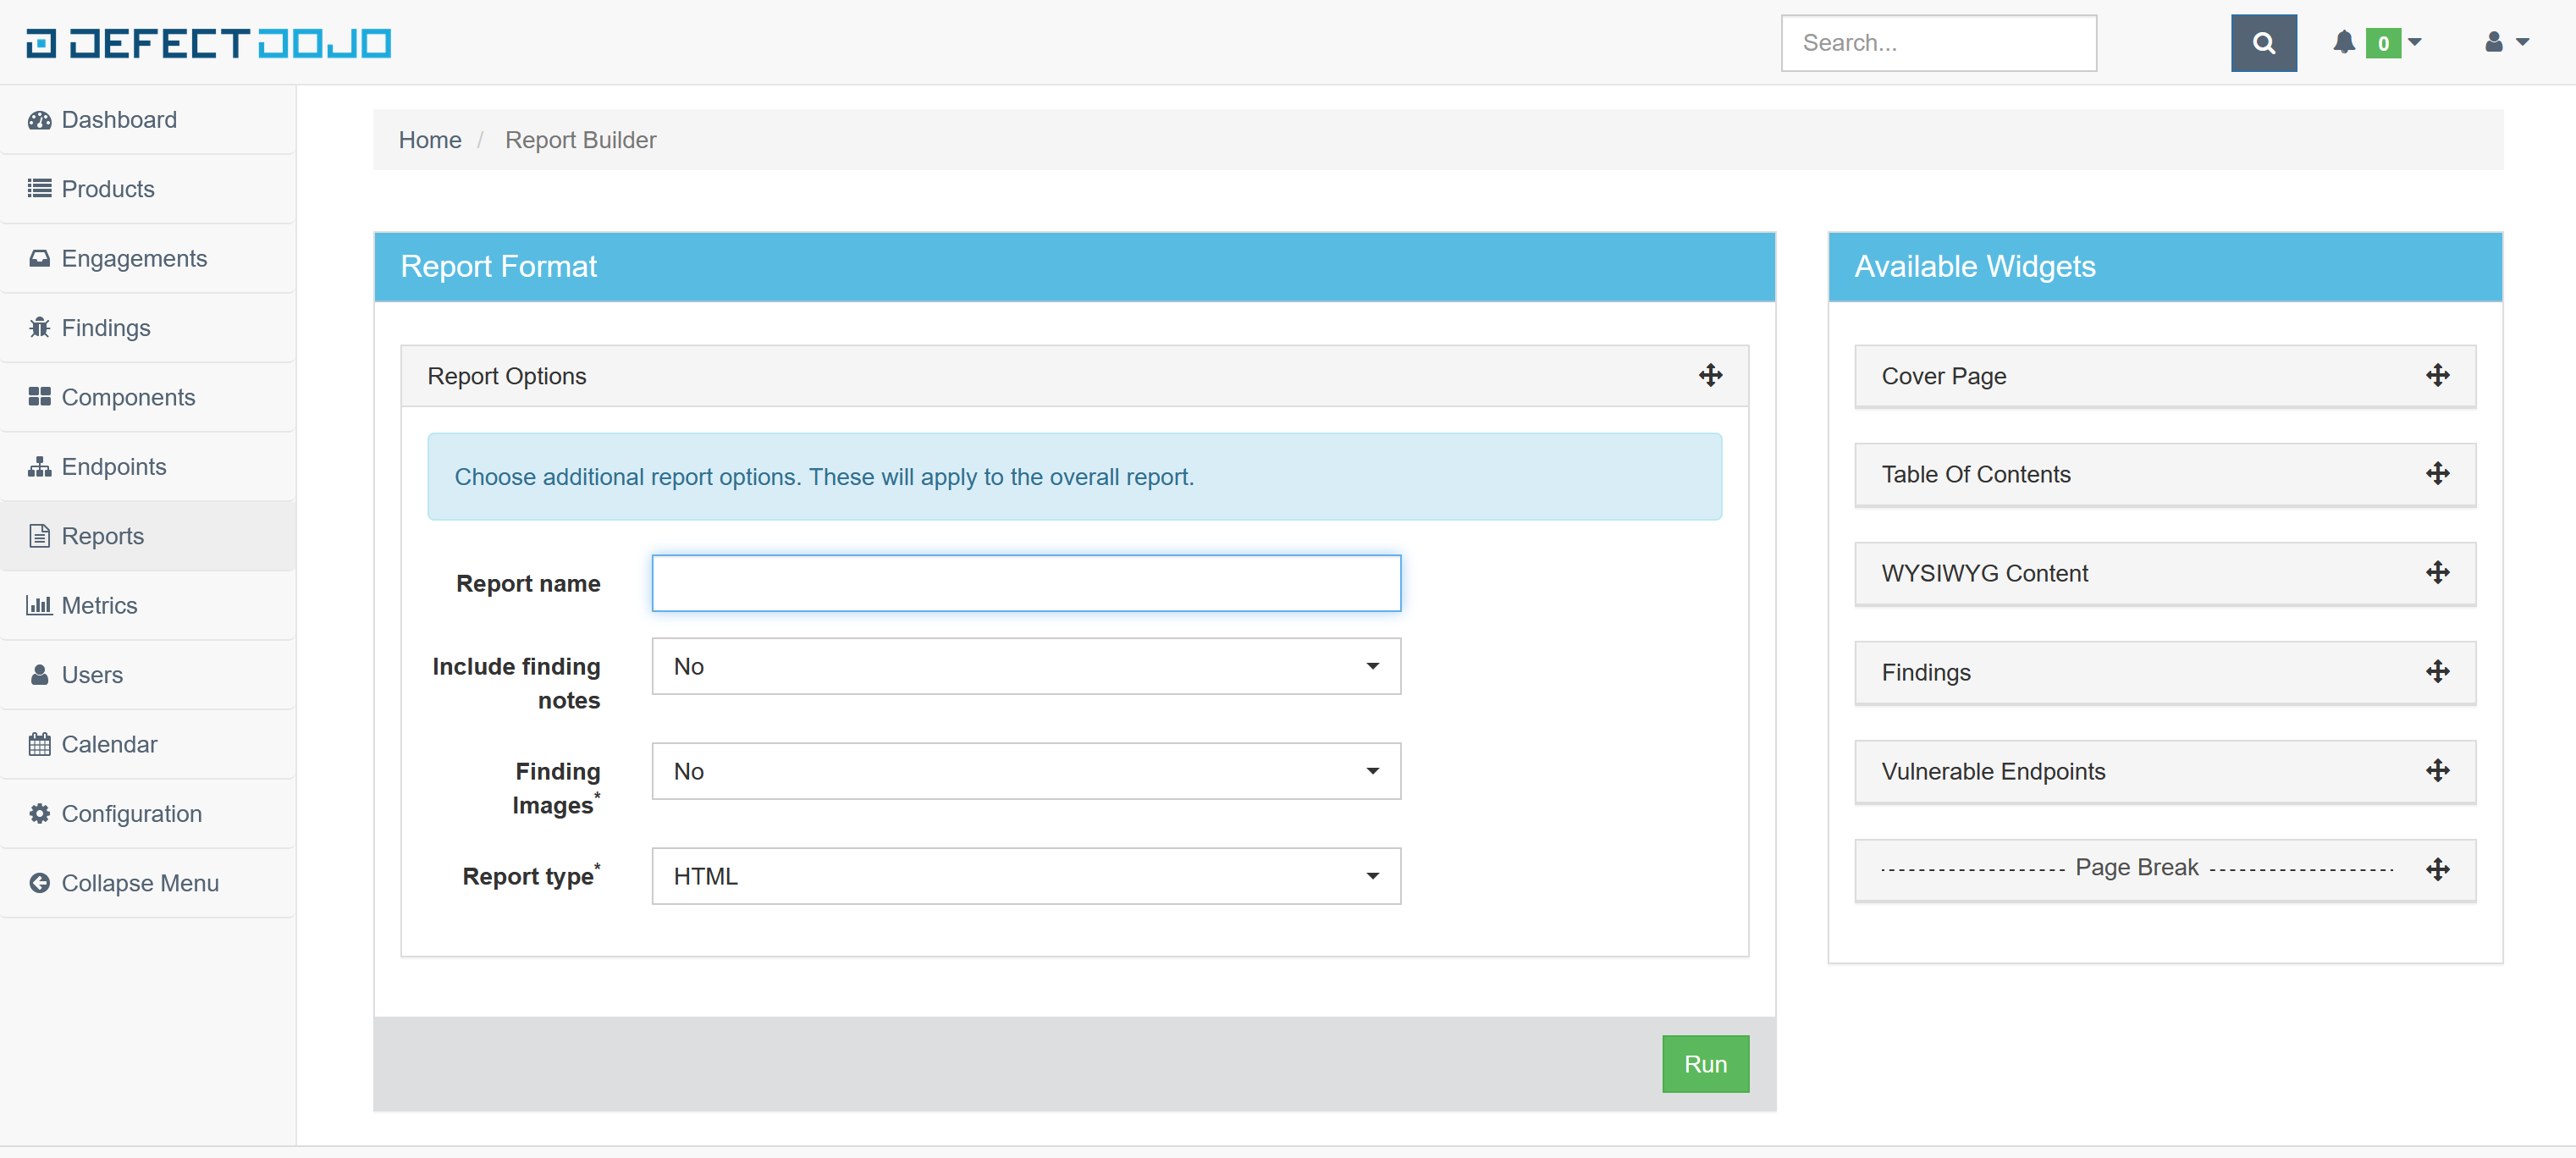
Custom reports, generated with the Report Builder, allow you to select specific components to be added to the report. These include:
- Cover Page
- Table of Contents
- WYSIWYG Content
- Findings
- Vulnerable Endpoints
- Page Breaks
DefectDojo’s reports can be generated in HTML.
Metrics
DefectDojo provides a number of metrics visualization in order to help with reporting, awareness and to be able to quickly communicate a products/product type's security stance.
The following metric views are provided:
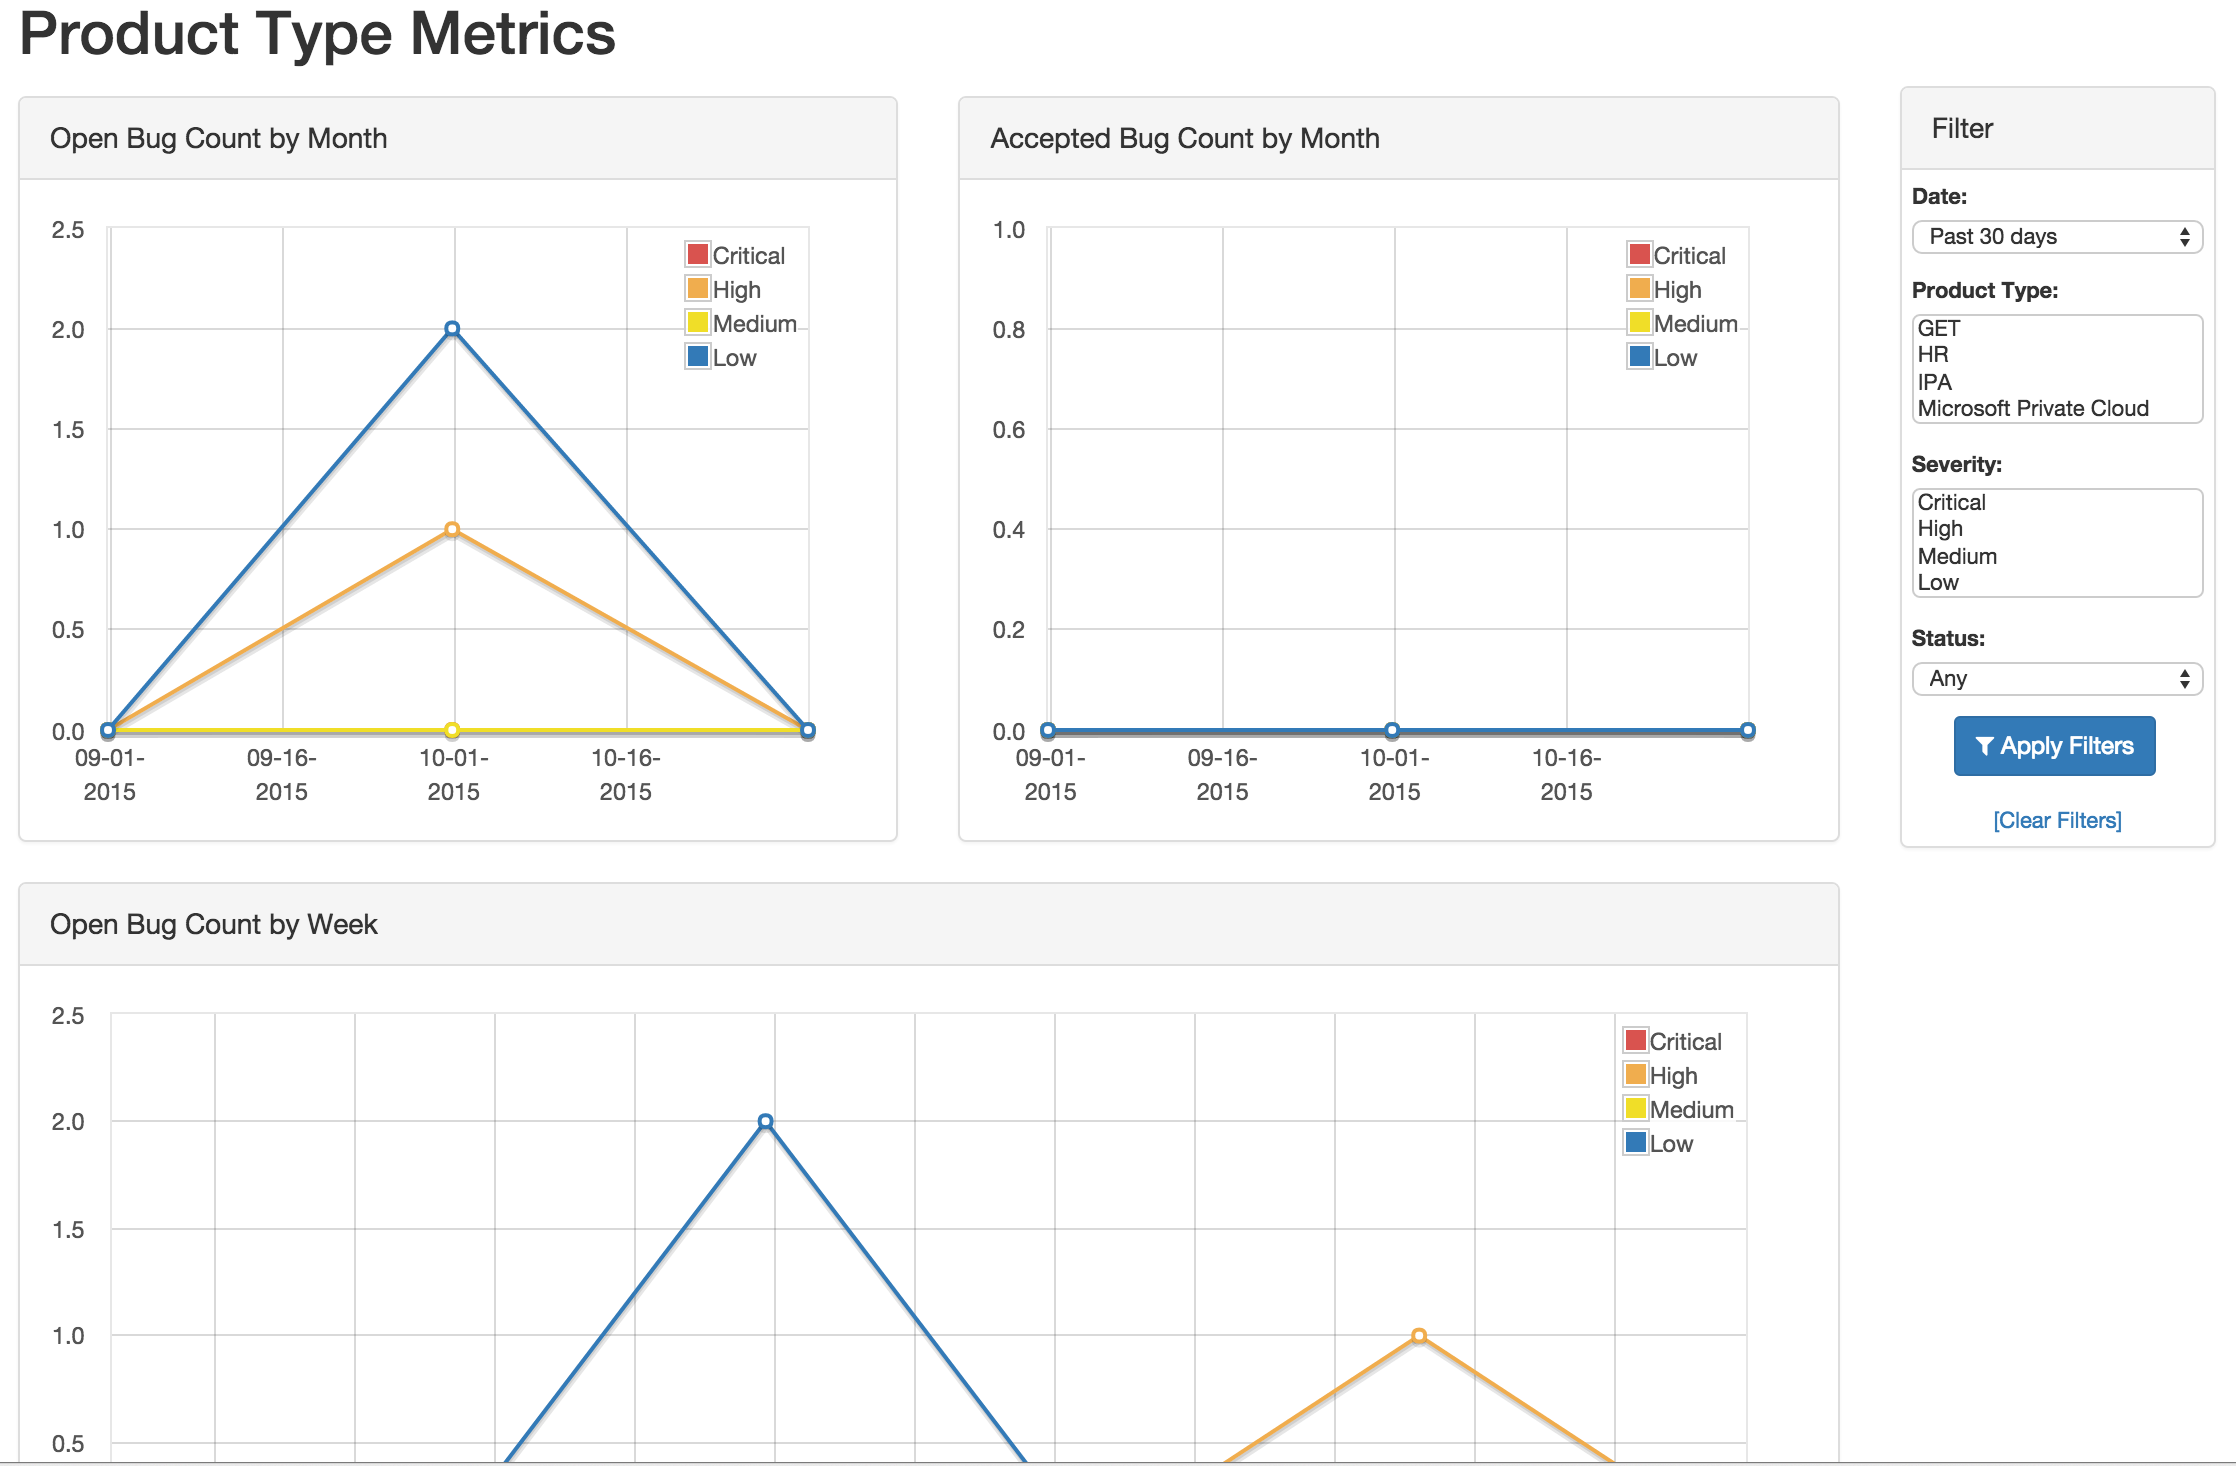
- Product Type Metrics
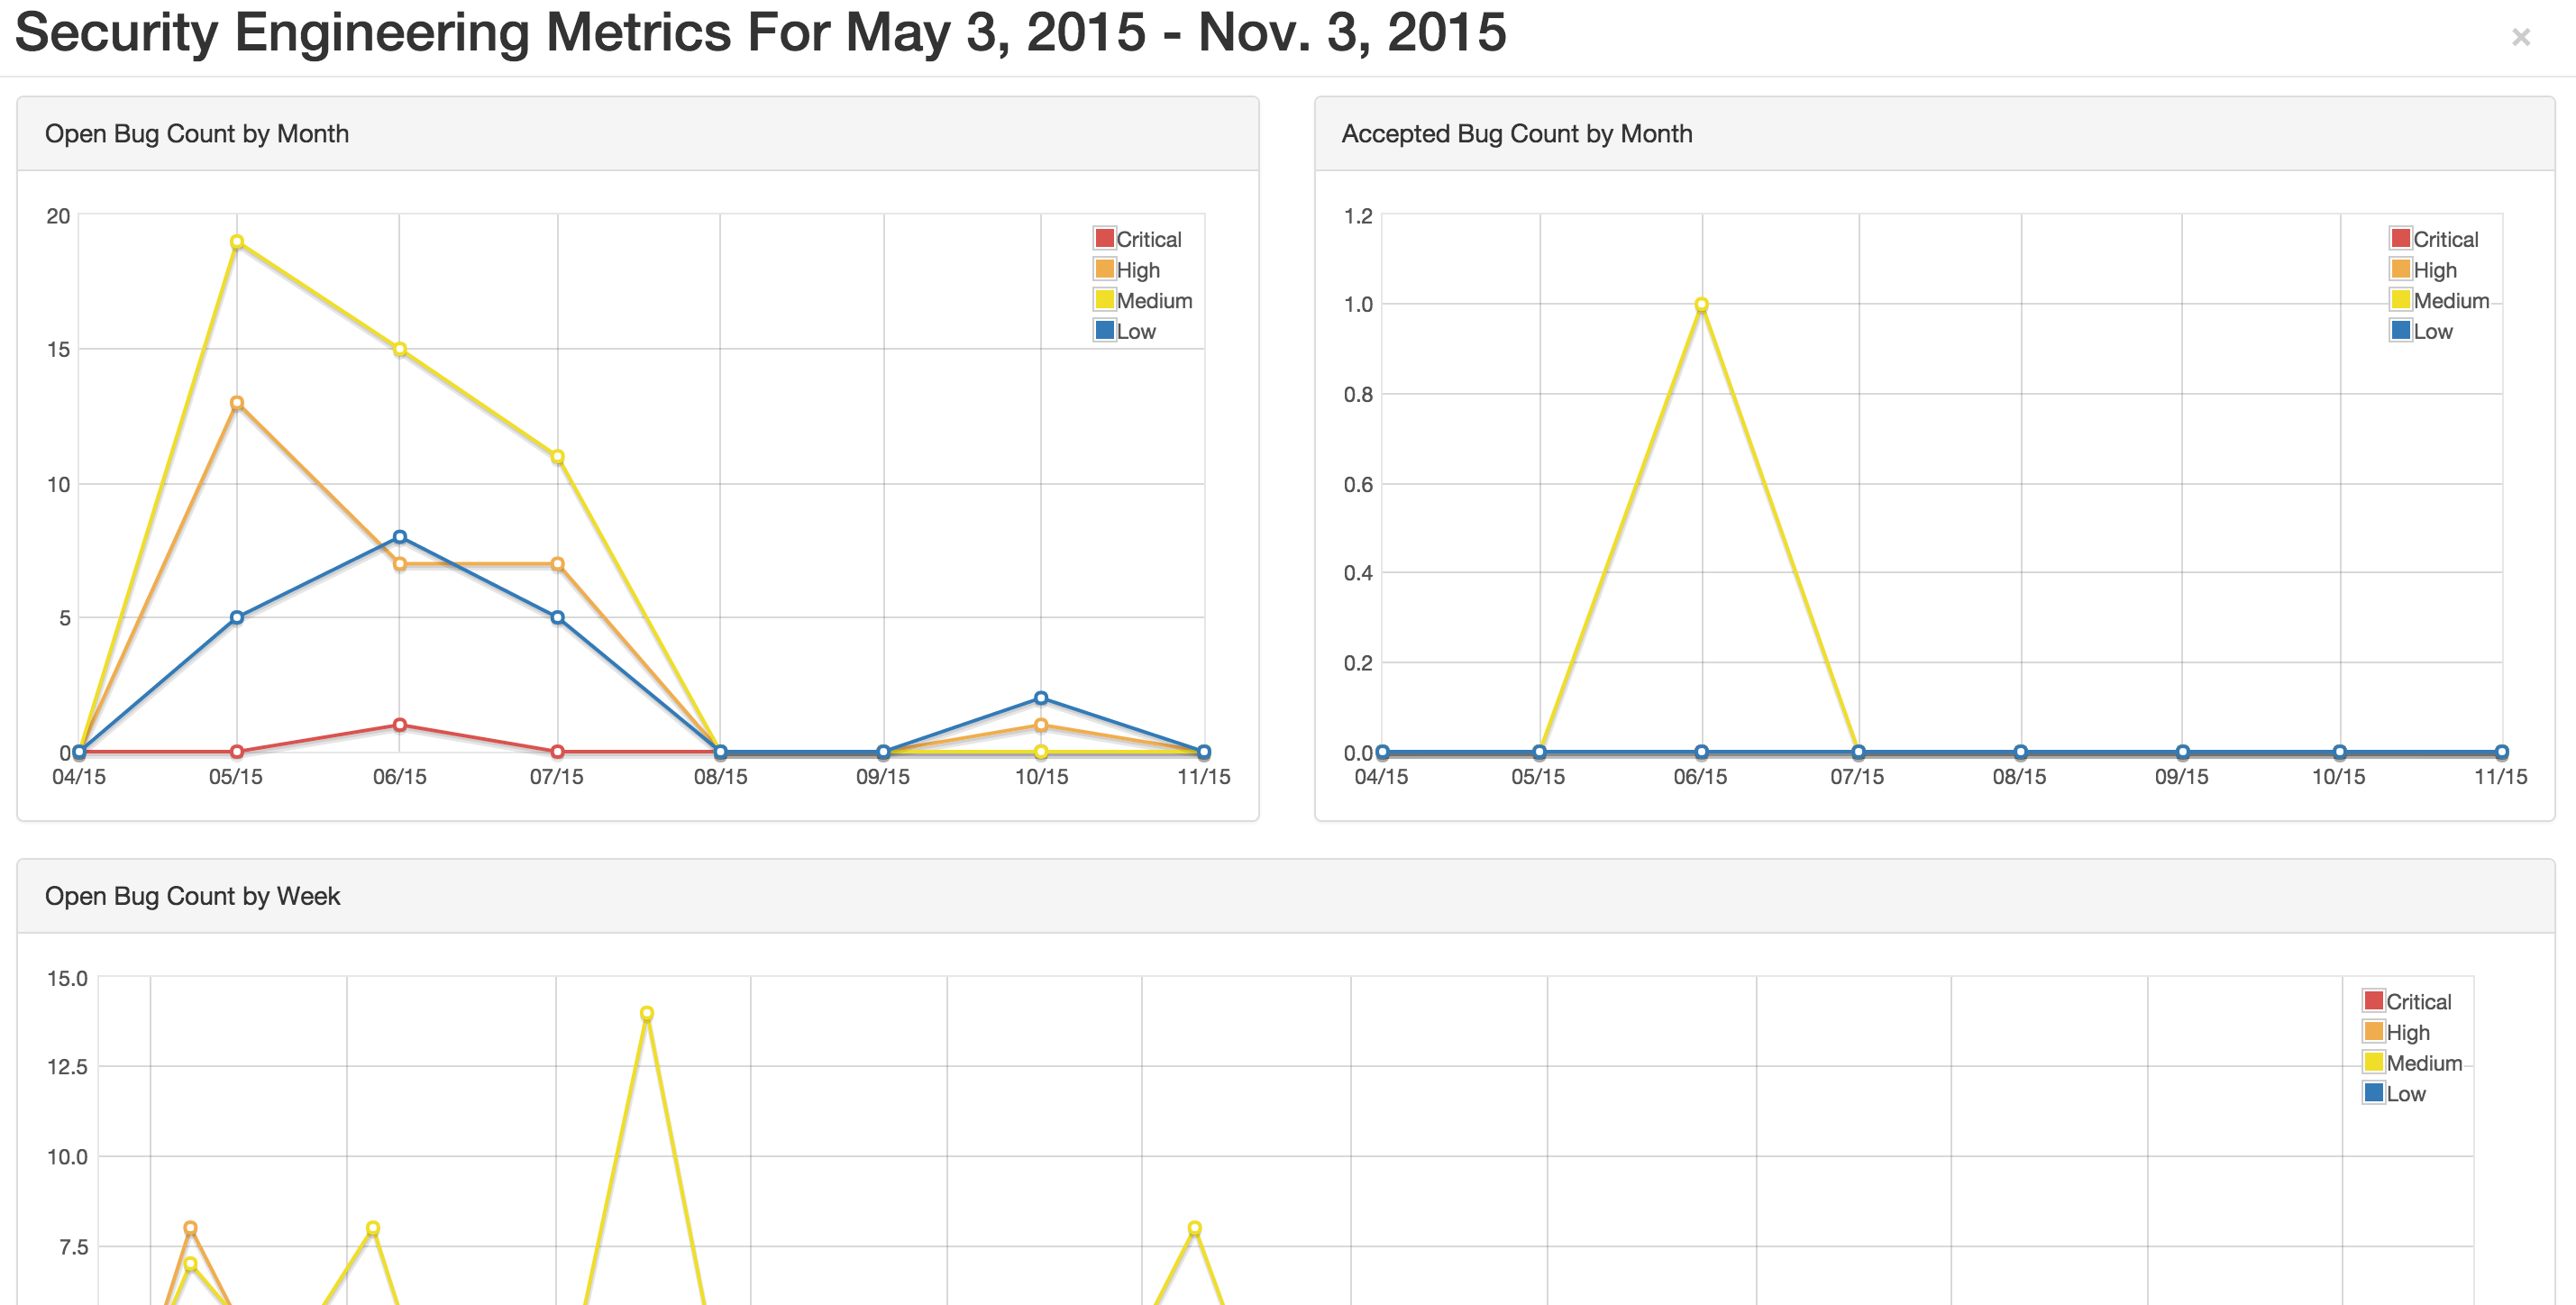
- This view provides graphs displaying Open Bug Count by Month,
Accepted Bug Count by Month, Open Bug Count by Week, Accepted Bug
Count by Week as well as tabular data on Top 10 Products by bug
severity, Detail Breakdown of all reported findings, Opened
Findings, Accepted Findings, Closed Findings, Trending Open Bug
Count, Trending Accepted Bug Count, and Age of Issues.
- Product Type Counts
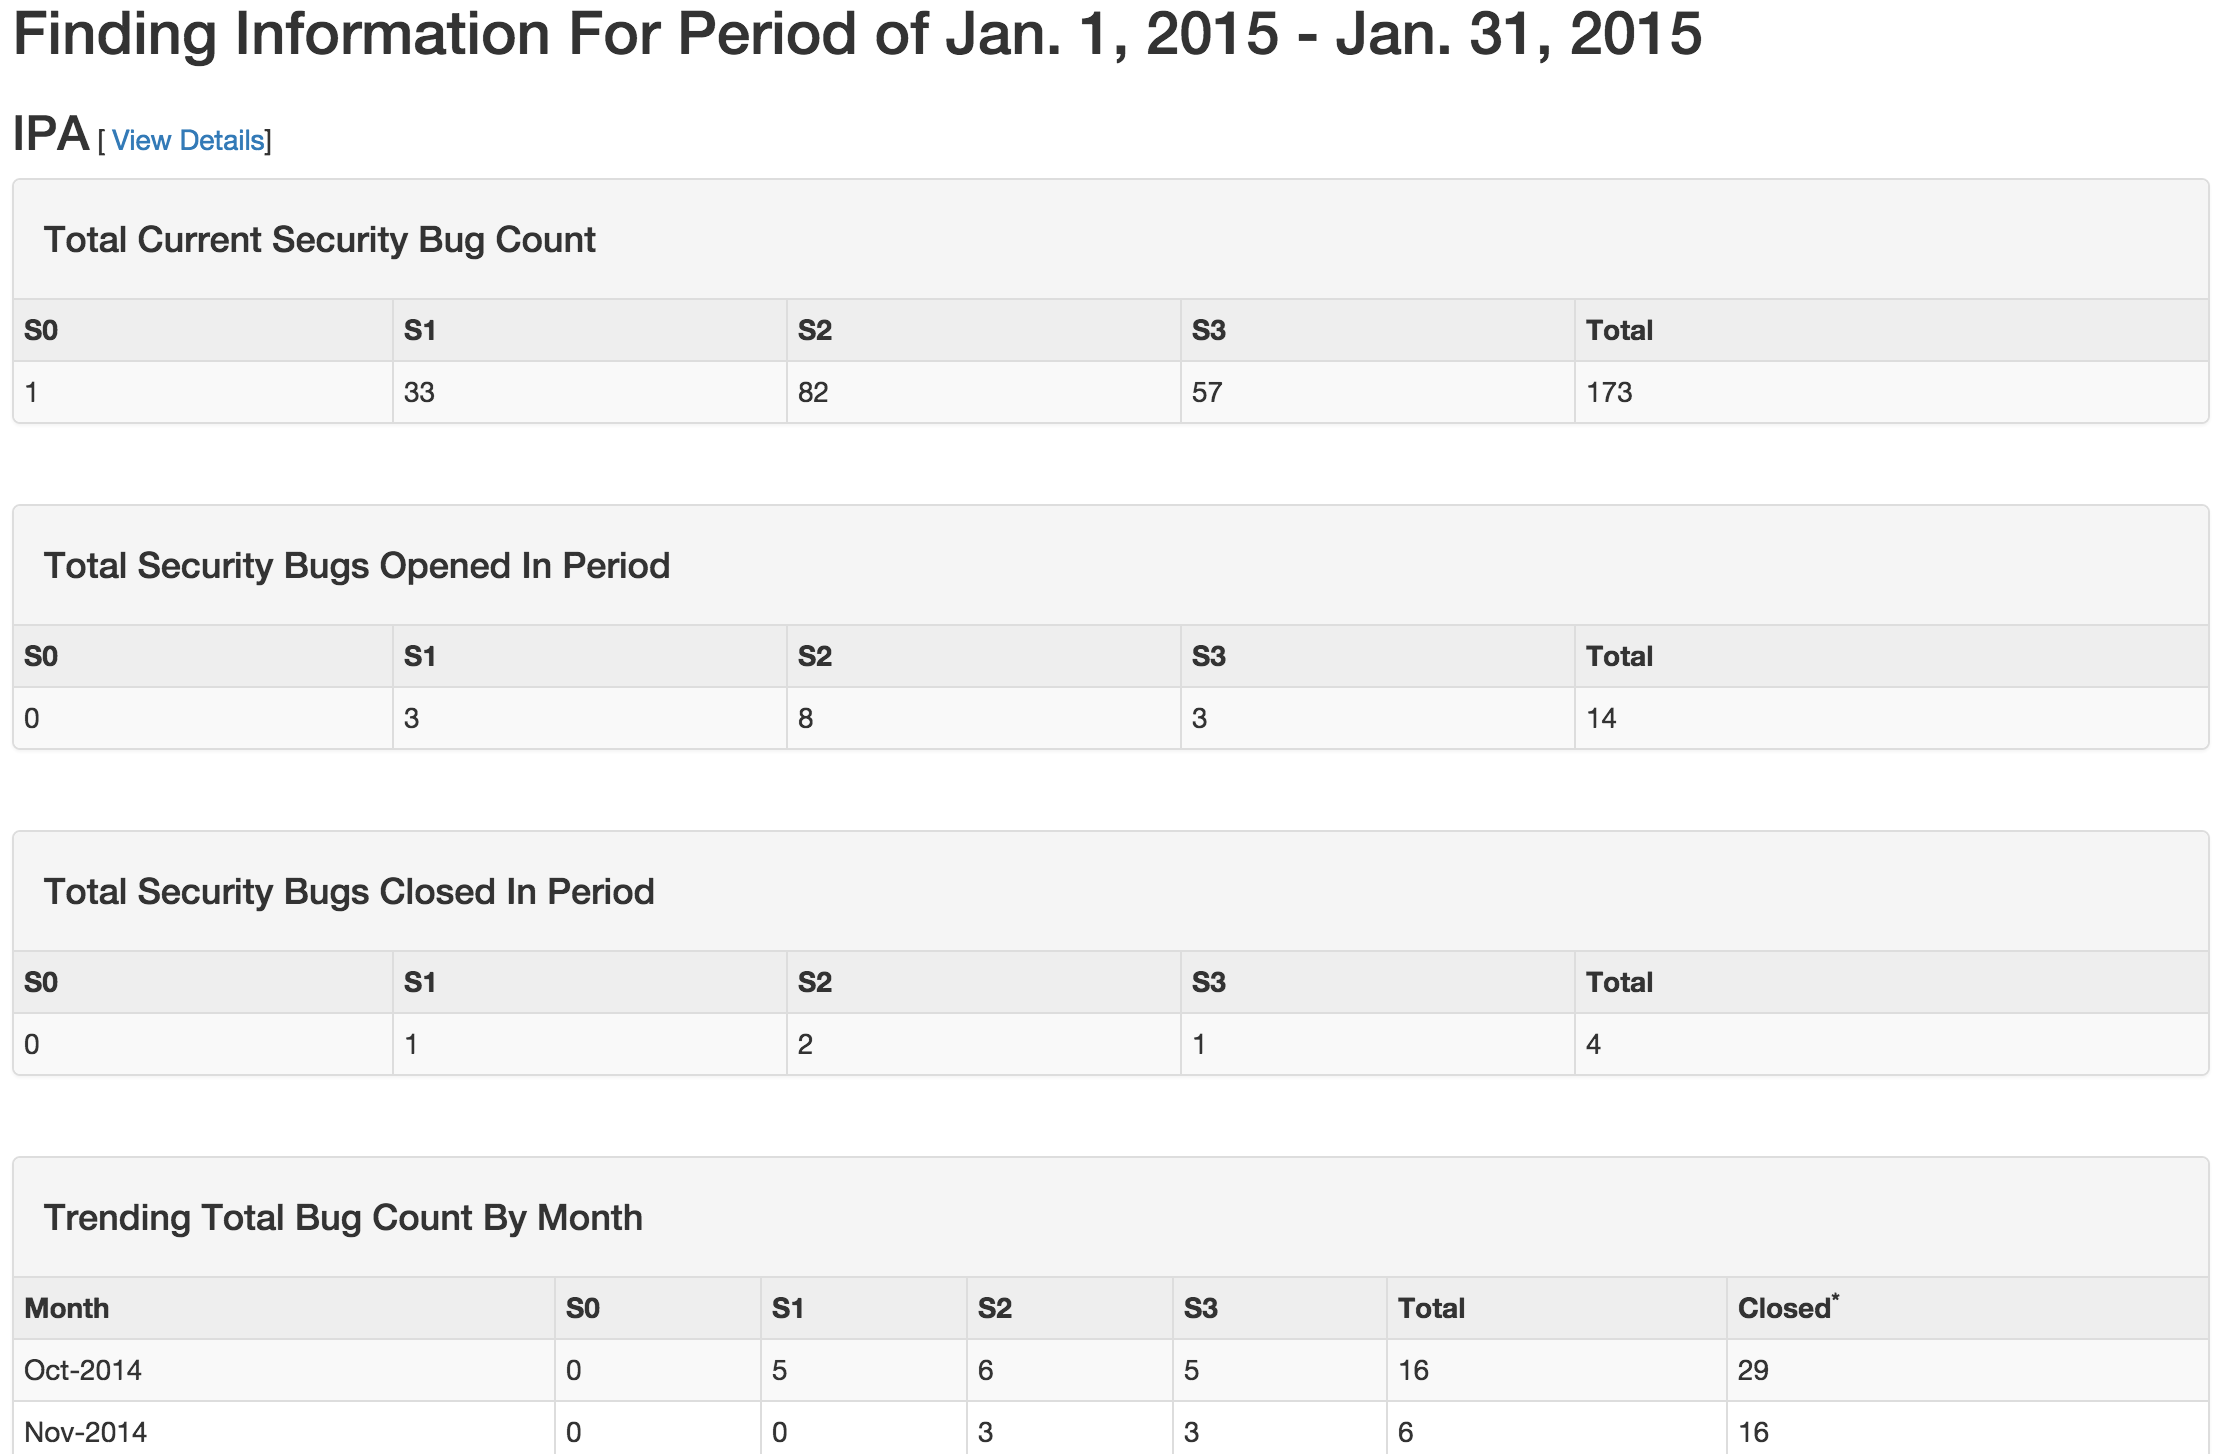
- This view provides tabular data of Total Current Security Bug Count,
Total Security Bugs Opened In Period, Total Security Bugs Closed In
Period, Trending Total Bug Count By Month, Top 10 By Bug Severity,
and Open Findings. This view works great for communication with
stakeholders as it is a snapshot in time of the product.
- Product Tag Counts
- Same as above, but for a group of products sharing a tag.
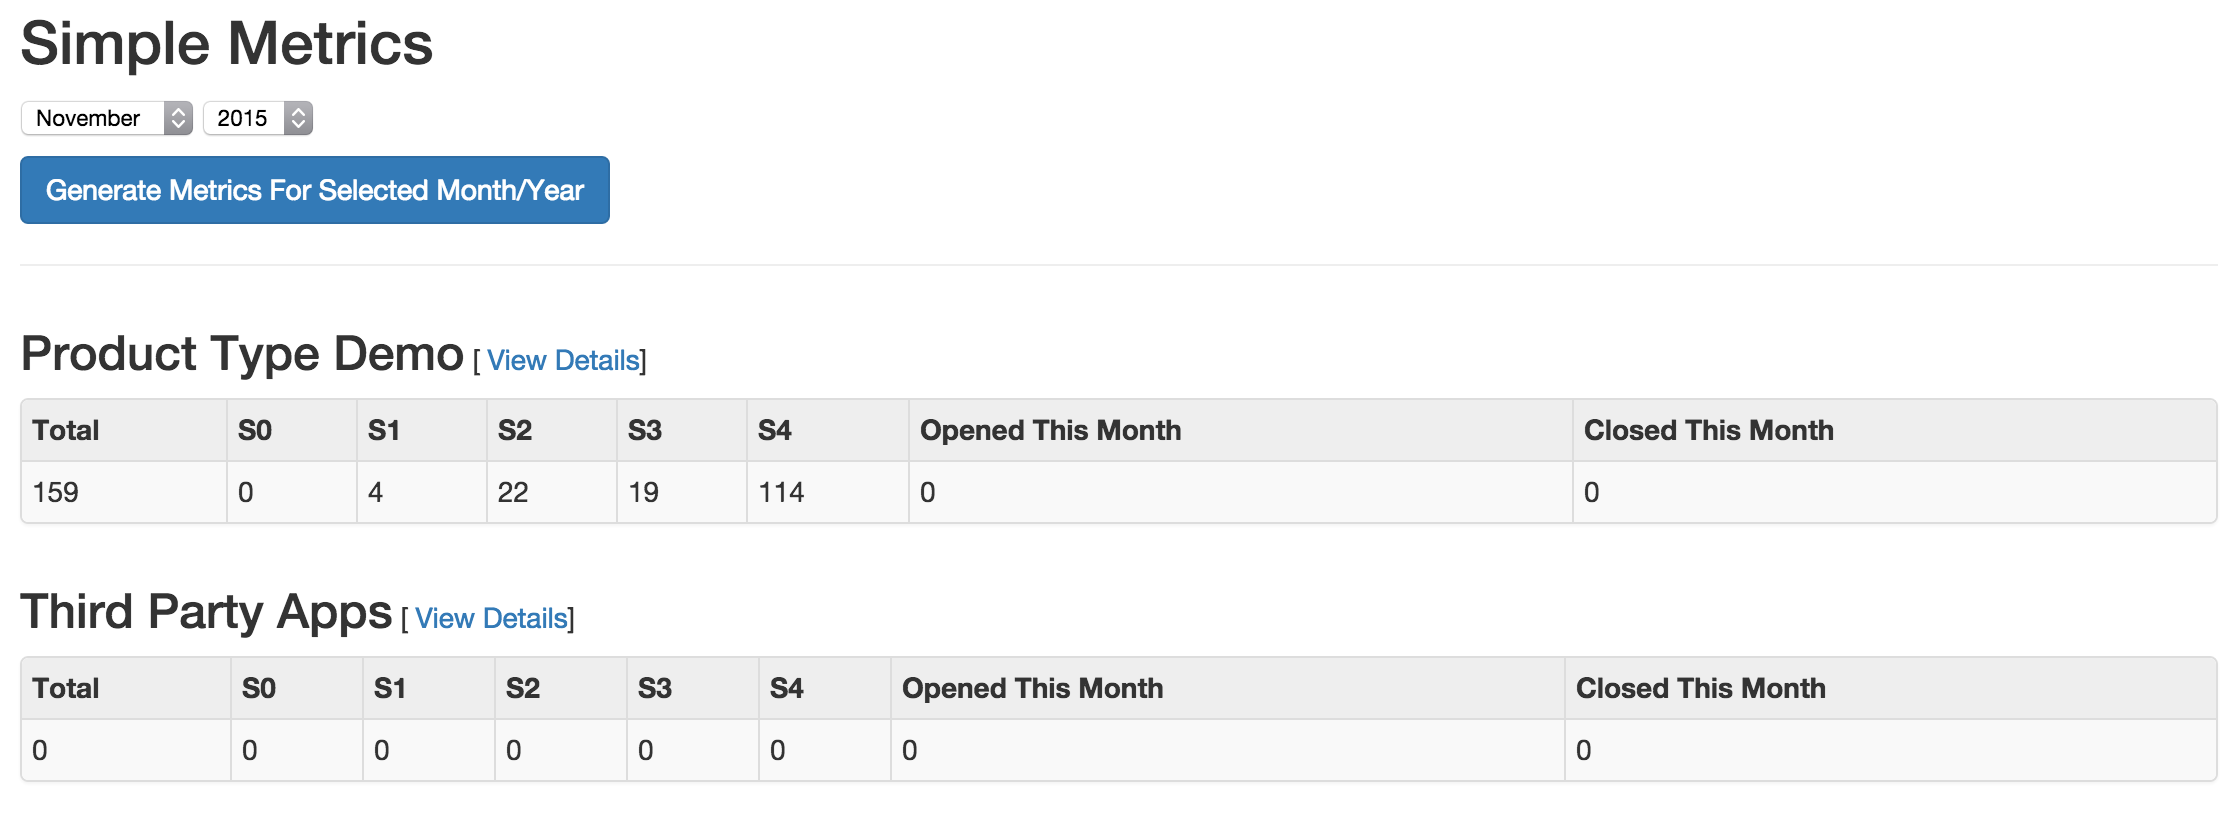
- Simple Metrics
- Provides tabular data for all Product Types. The data displayed in
this view is the total number of S0, S1, S2, S3, S4, Opened This
Month, and Closed This Month.
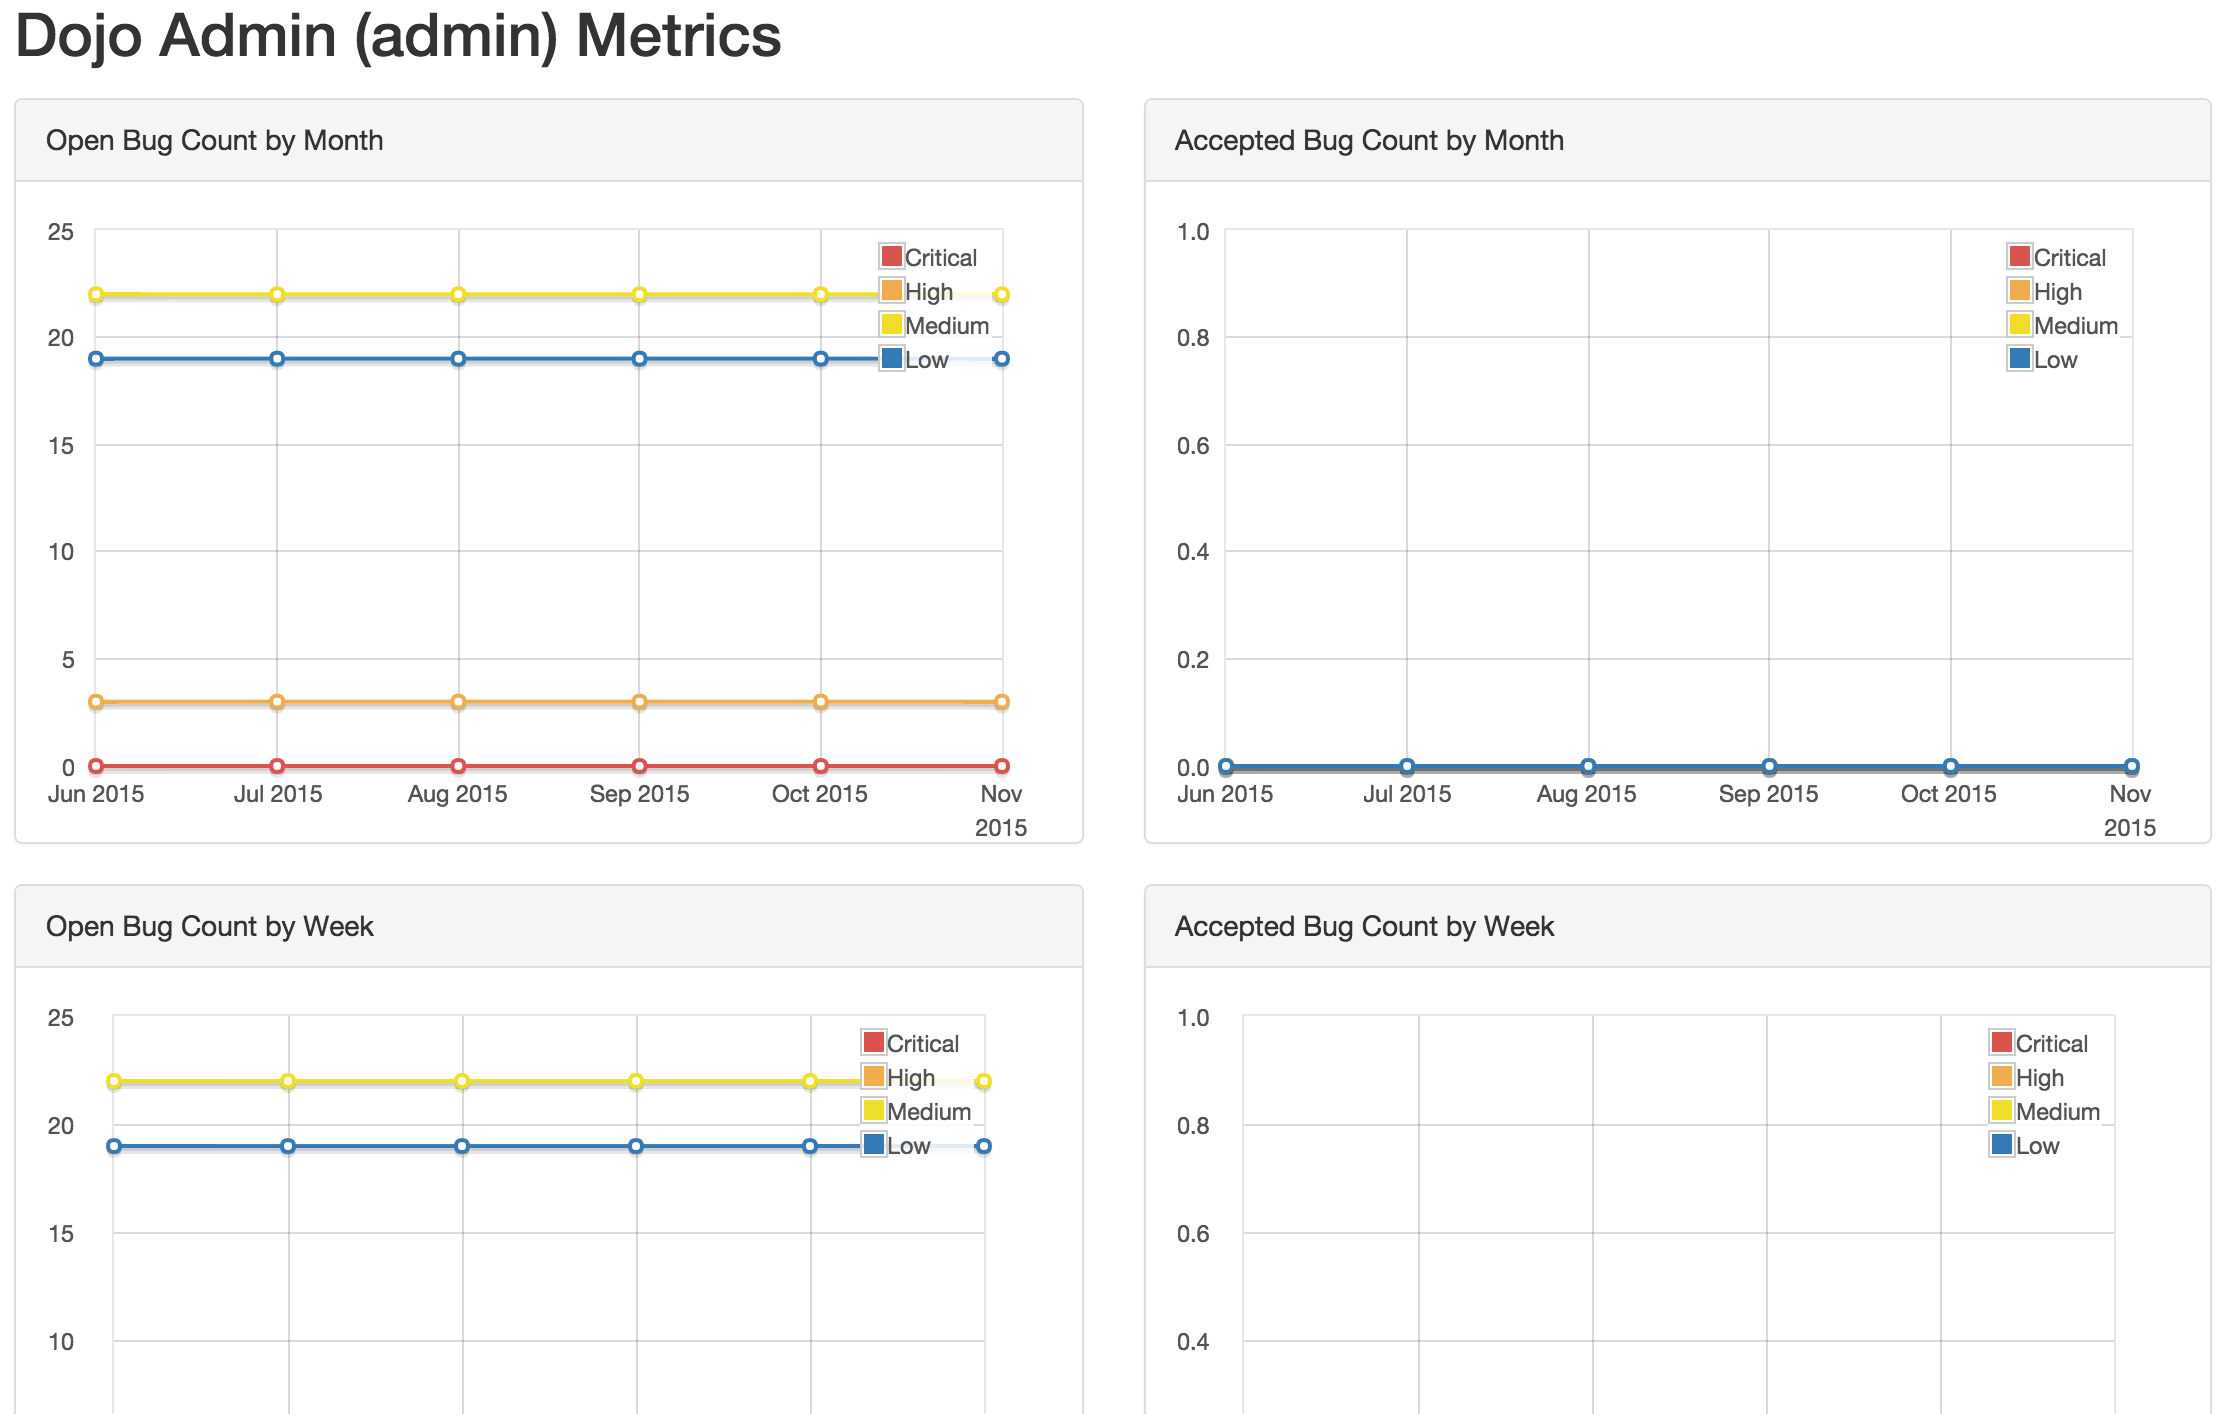
- Engineer Metrics
- Provides graphs displaying information about a tester's activity.
- Metrics Dashboard
- Provides a full screen, auto scroll view with many metrics in graph
format. This view is great for large displays or "Dashboards."
Users
DefectDojo users inherit from django.contrib.auth.models.User.
A username, first name, last name, and email address can be associated with each user. Additionally the following attributes describe the type of users:
- Active
- Designates whether this user should be treated as active and can login to DefectDojo. Unselect this instead of deleting accounts.
- Superuser status
- Designates that this user can configure the system and has all permissions for objects without explicitly assigning them.
A superuser may force a password reset for any user at any given time. This can be set when creating a new user, or when editing an existing one, requiring the user to change their password upon their next login.
DefectDojo enforces the following password rules for all users:
- Must meet a length requirement of 9 characters
- Must be unique (not commonly used)
- Must contain one of each of the following: a number (0-9), uppercase letter (A-Z), lowercase letter (a-z), and symbol ()[]{}|~!@#$%^&*_-+=;:`'",<>./?
Calendar
The calendar view provides a look at all the engagements and tests occurring during the month d, week or day displayed. Each entry is a direct link to the respective engagement or test view page.
Benchmarks
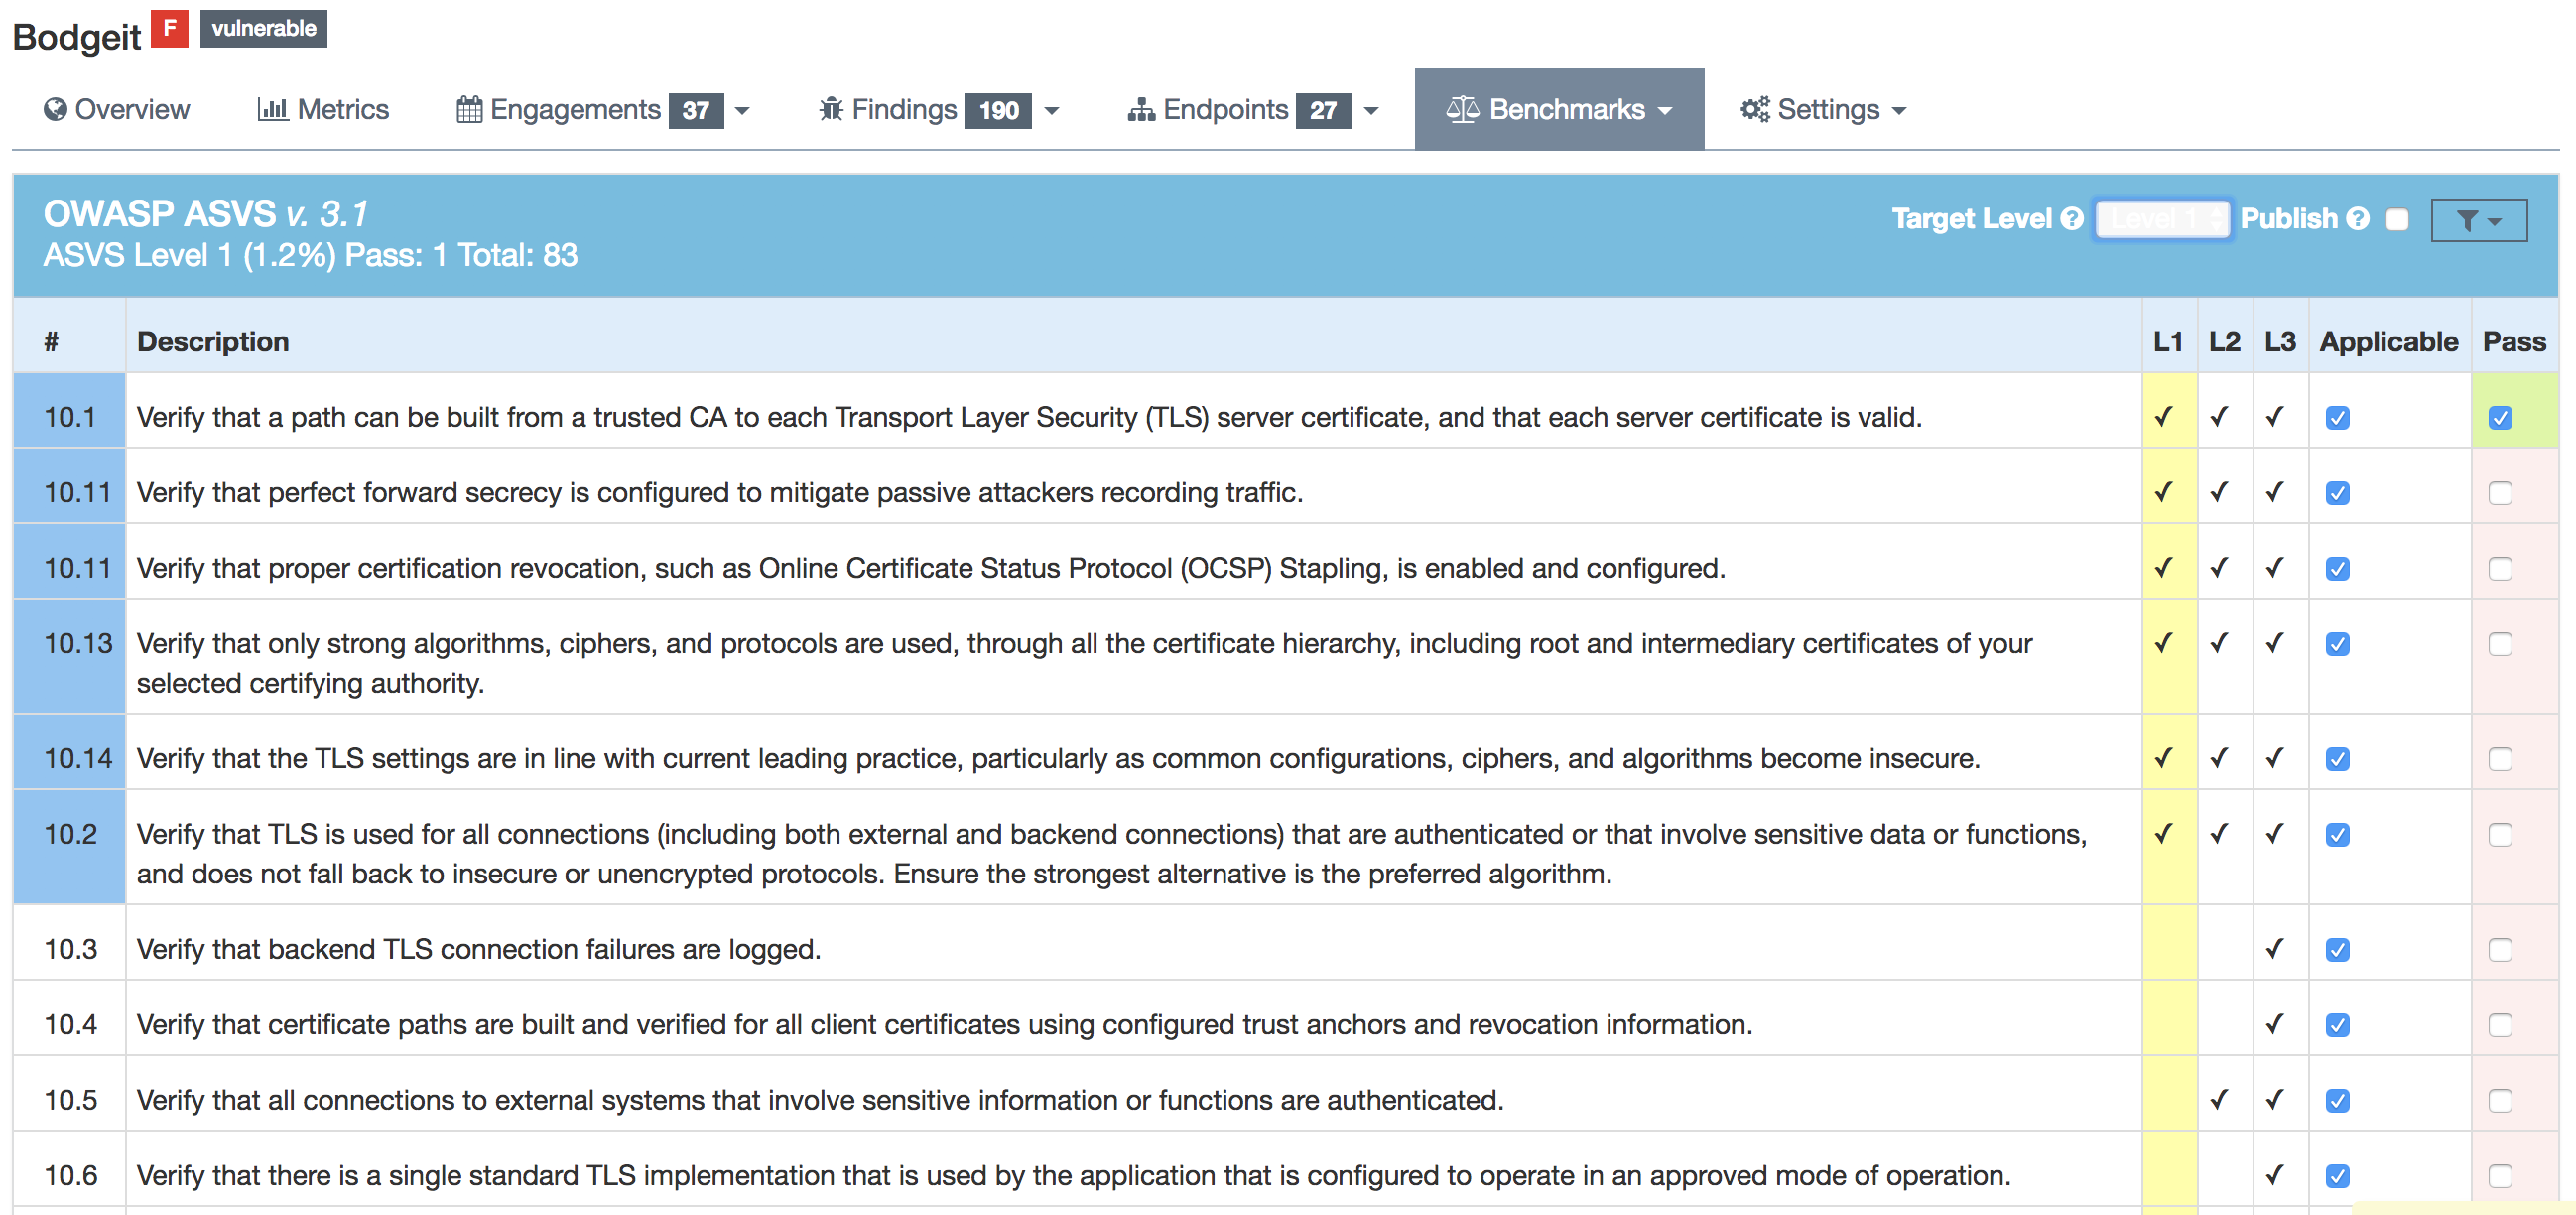
DefectDojo utilizes the OWASP ASVS Benchmarks to benchmark a product to ensure the product meets your application technical security controls. Benchmarks can be defined per the organizations policy for secure development and multiple benchmarks can be applied to a product.
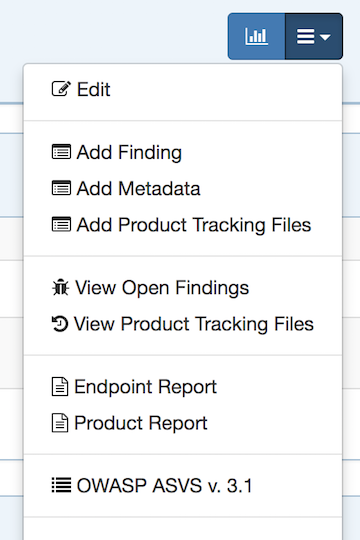
Benchmarks are available from the Product view. To view the configured benchmarks select the dropdown menu from the right hand drop down menu. You will find the selection near the bottom of the menu entitled: 'OWASP ASVS v.3.1'.
In the Benchmarks view for each product, the default level is ASVS Level
- On the top right hand side the drop down can be changed to the desired ASVS level (Level 1, Level 2 or Level 3). The publish checkbox will display the ASVS score on the product page and in the future this will be applied to reporting.
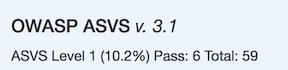
On the left hand side the ASVS score is displayed with the desired score, the % of benchmarks passed to achieve the score and the total enabled benchmarks for that AVSV level.
Additional benchmarks can be added/updated in the Django admin site. In a future release this will be brought out to the UI.
Endpoint Meta Importer
For heavy infrastructure scanning organizations, endpoints need to be as flexible as possible to get the most of DefectDojo. This flexibility comes in the form of Tags and custom fields. Tags allow users to filter, sort, and report objects in ways the base object is not totally proficient in doing.
Endpoint Meta Importer provides a means to apply arbitrary tags and custom fields to endpoints in mass via a CSV file. Tags and customs fields are stored in the format of column:row.
Here is a very simple example with only two columns:
hostname                     | team                | public_facing
------------------------------------------------------------------
sheets.google.com            | data analytics      | yes
docs.google.com              | language processing | yes
feedback.internal.google.com | human resources     | no
The three endpoints hosts will be used to find existing endpoints with matching hosts, or create new endpoints, and then apply meta as follows:
sheets.google.com (endpoint) -> [ team:data analytics, public_facing:yes ] (tags)
docs.google.com (endpoint) -> [ team:language processing, public_facing:yes ] (tags)
feedback.internal.google.com (endpoint) -> [ team:human resources, public_facing:no ] (tags)
Endpoint Meta Importer can be found in the Endpoint tab when viewing a Product
Note: The field “hostname” is required as it is used to query/create endpoints.
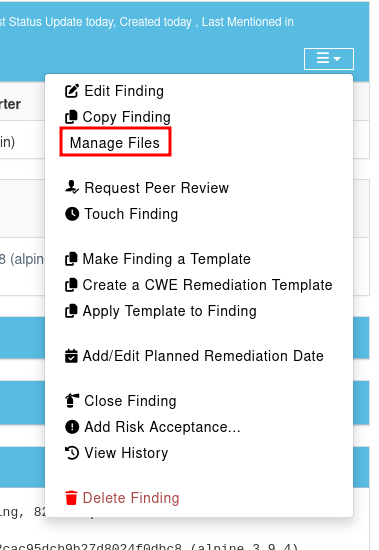
Findings Image Upload
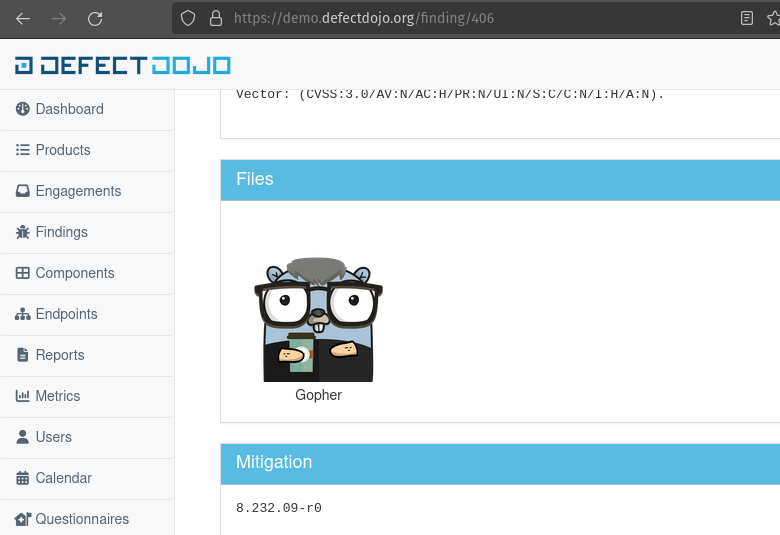
You can add images (.png, .jpeg, .gif) to your findings. In order to achieve this, you have to click on “Manage Files” within the finding:
 There, you can upload a png file to attach it to a finding:
 The following picture shows the result: